How To Make A Double Sided Door Draft Stopper

The cold weather really hit us last week and we definitely felt the cold air coming in from under some of the doors!  Last year I weather stripped the doors, but the bottom of the doors this year seem to be a problem.  I tried rolling up towels and placing at the bottom of the doors, but they would un-roll and once you opened the door and went out – well the drafty air would come right in.  I decided it was time to make some door draft stoppers – yes you can buy them, but they are so easy to make – why!?

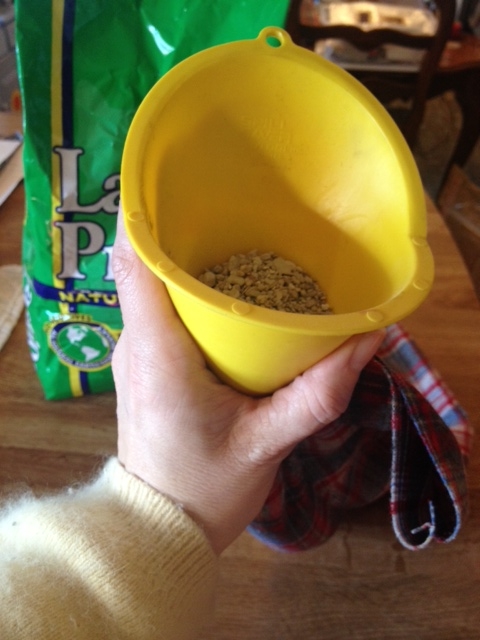
Once I made the double sided one I was on a roll and decided to go ahead and make 2 single sided ones for the doors we don’t go in and out of the house from.  I had some flannel like material that had been given to me and it was perfect!  Many of the DIY draft stoppers say to use rice, but I decided to go with cat litter.  I could get a 7 lb bag of cat litter at the dollar store for $1 and I was able to fill a double sided draft stopper and 2 single draft stoppers.

Double Sided Draft Stopper
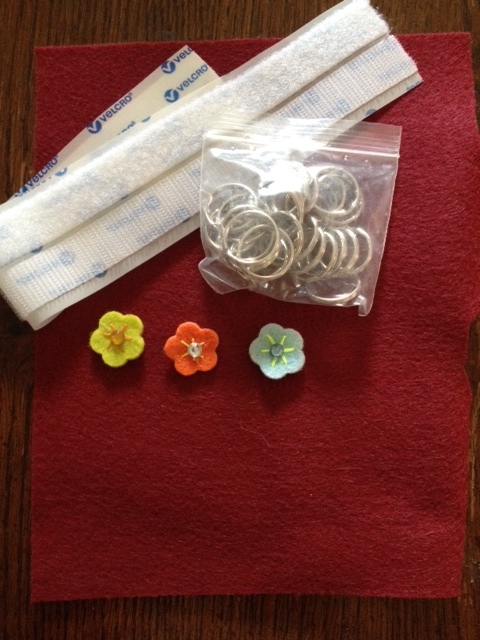
Draft done

Items Needed

Material
Thread
Needle
Sewing machine
Ruler
Cat litter
Funnel
Velcro (optional)

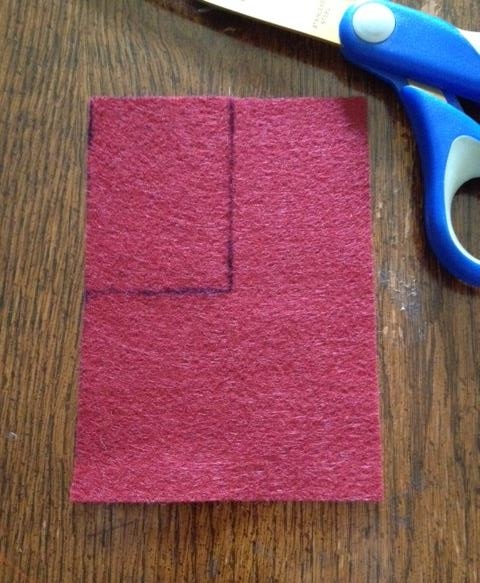
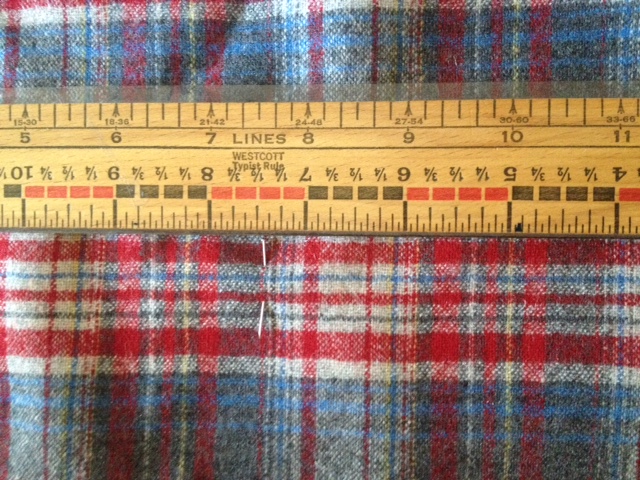
1. Measure the length and the width of your door.  My door was 34″ long and 2″wide.

2. Measure and cut your material, preferably with one side being the fold (length wise).  I added 1″ on to the length of the material (for seem allowance) and made the width 7 1/2″.  The width was 2″ for the door width and 2 3/4″ inches for each draft stopper (allowing for seam).

Draft measuring width

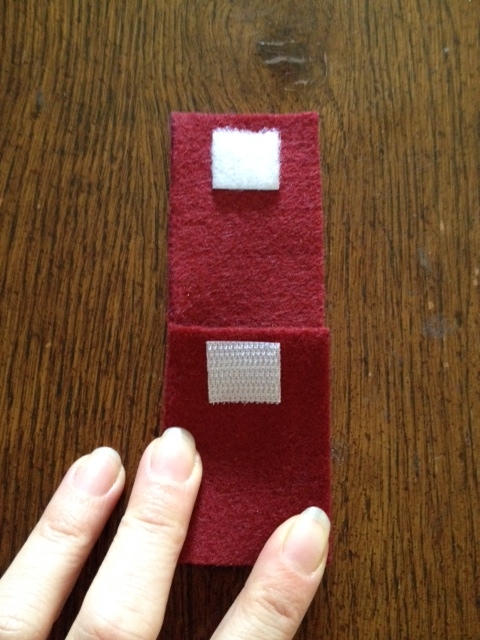
3. Pin your material together, right side to right side. Sew along one length side and one end, if your have a fold, if not sew along both length sides and one end.  I double seamed, knowing that this door draft stopper would be getting a lot of wear and tear. The first seam was 1/2″ and the second seam was a little less.

Draft pin together


Draft sewDraft double seam

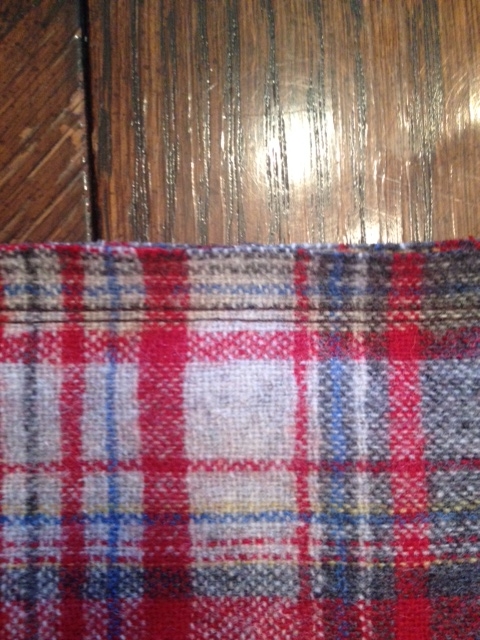
4. Turn your stopper right side out.

5.  Mark where you are going to make you seams for the two draft stopper parts of your stopper.  I marked a line at 2 3/4″ from one seam and then measured 2″ from that line and made another line.

Draft 2 inches

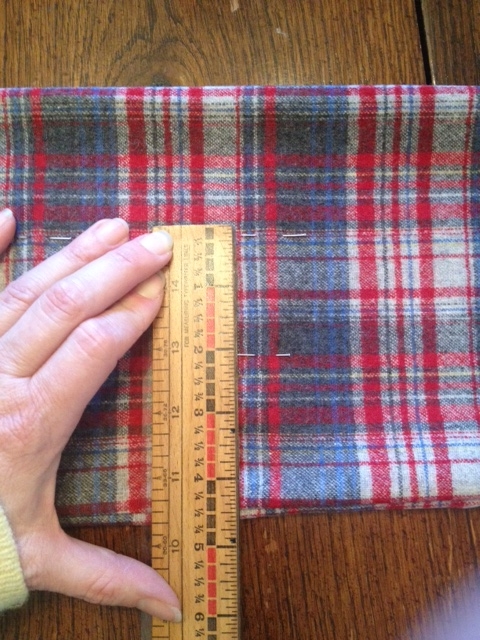
6. Sew your seams for the 2 draft stoppers.

7. Using a funnel fill one side of your draft stopper and hand sew closed.  Now fill the other side and sew the end up.

Draft fill

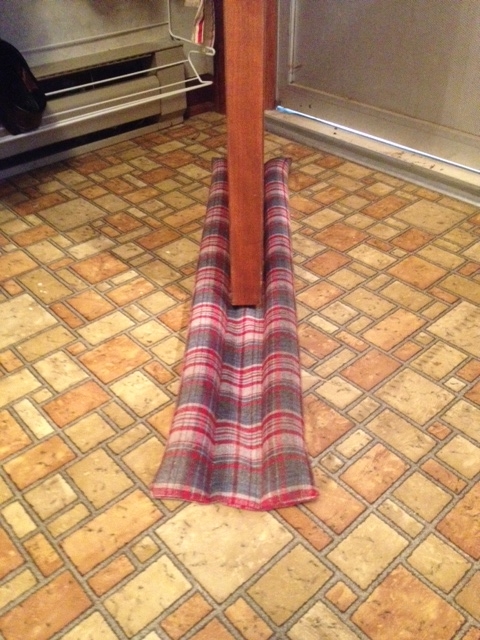
8. Slide under your door and that is it!

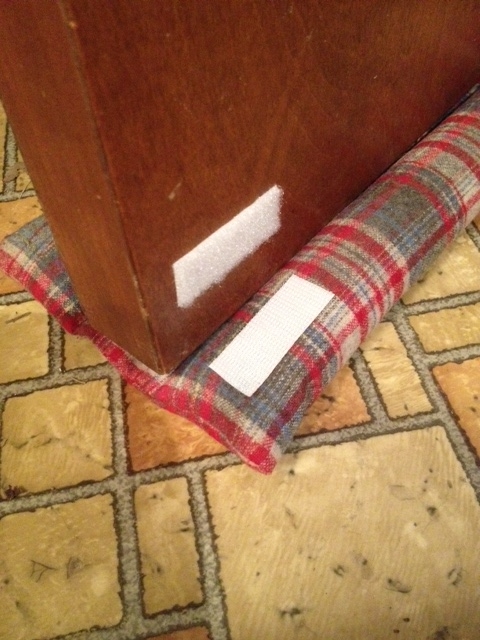
We have a door sweep that catching our draft stopper so using velcro I attached the corner of the stopper to the corner of the door.

Draft velcro

To make a single door draft stopper – follow directions but don’t add for under the door or the other side stopper.

Draft single

Digiprove sealCopyright secured by Digiprove © 2015
Posted in Crafts, Sewing | Tagged , | 1 Comment

Banana Chocolate Chip Brownies

What to do with the bananas that seem to ripen overnight?  I was getting tired of banana bread and wanted to try something different, especially since the freezer seemed to exploding with all the overripe bananas that had been collecting.  One week I will not be able to keep enough bananas in the house and then the next week Stella will just stop eating them, with no notice or anything, this is what keeps our freezer full of very ripe bananas!

I had done banana cookies and they were good, banana pancakes, banana muffins but I really wanted something closer to a brownie and why not banana?!

Banana Chocolate Chip Brownies

Banana served

Ingredients (preferably organic)

3/4 cup butter, softened
1/3 cup  sugar
1 cup brown sugar, packed
1 egg, free-range, organic
1 tsp vanilla
3 – 4 very ripe bananas, mashed (about 1 cup)
2 cups flour
2 tsp baking powder
1 tsp sea salt
1/2 tsp cinnamon
2 cup chocolate chips, we used a combo of dark and bittersweet chips

1. Preheat the oven to 350 degrees and line a baking sheet with parchment paper.

2. Using an electric mixer or stand mixer, cream together the butter and sugars.

Banana butter sugar

3. Add the egg and mix until fluffy and creamy.

Banana egg

4. Mash the bananas and then add to mixture along with the vanilla, mix well.

Banana mash

Banana b added

5. Add the flour, cinnamon, baking powder and salt to the mixture, mix until incorporated into the batter.

Banana flour

6. Add the chocolate chips, stir in by hand.

Banana chips

7. Spread the batter into the pan and bake for 20 – 25 minutes, the brownie should spring back and be golden brown.

Banana in pan

8. Allow to cool completely, cut and serve.  Ok – you could cut them when they are still warm – we couldn’t resist!

Banana out of oven

Digiprove sealCopyright secured by Digiprove © 2015
Posted in Dessert, Recipes | Tagged , , , , | 3 Comments

Never Loose Your Chap-stick Again!

I get quite a few newsletters for homesteading and crafting and when I saw this knew I had to make it!  I try to keep a tube of chap-stick in my purse, the car, coat pocket, bathroom – pretty much everywhere, but when I need it, I never have it!  Stella is the same way – so to the crafting cabinet I went and I had everything needed!  The sewing machine came out and off I went.  I shared the finished product with a friend and she asked me to make 2 for her grand-daughters – done!

The only velcro I had was with the sticky back – I would not recommend this if you are using your sewing machine – it really gunks up the needle.  After the first one I hand sewed the velcro on to the others.  So wish I had just regular velcro – will for the next ones!

Chap-Stick Holder Key Ring (thank you favecrafts.com)

Chap done 3

Items Needed

Felt
Key ring
ChapstickChap items
Scissors
Velcro
Sewing machine (or you can do my hand)
Sewing needle
Thread
Embellishments

1. Cut a square piece that measures 3 1/2 inches by 5 inches.

Chap square

2.At 2 1/2 inches from the top, cut to a halfway point. Then trim lengthwise to make an L shape.

Chap l

3. You’ll be folding over the bottom part and sewing it shut. But first sew on the velcro pieces and any embellishments you will be using.

Chap velcro

Chap sew

Chap embelishments

4. Using the piece that you cut out from the square to make the “L”, cut a long rectangular piece of felt, for the keyring.

Chap key

5. Fold over the felt to make the pocket, and pin together remembering to pin in the piece of felt with the key ring (I pinned the ring onto the side).  Sew the side and bottom seams.

Chap pinned

6. Slide your chap-stick into the pocket, close up and you are ready to attached to a backpack, key chain, your purse and never be without chap-stick again!

Chap done2

Chap done1

Digiprove sealCopyright secured by Digiprove © 2015
Posted in Crafts, Sewing | Tagged , , | 2 Comments

Kids Can Cook: Salad to Go

How many parents hear this remark from their kids? “Mom, I have been really craving a salad lately, could you pick up some lettuce, tomato, avocado, carrots and mushroom so that I can bring a salad to school.”  This is what Stella said to me the other day and it made me grin! Most kids, I think, say they are craving candy, cookies or some type of sweets – but not my daughter – she also told me she really wanted me to make mushroom soup, that is a later post.  I love the fact that Stella craves healthy foods and listens to what her body is wanting.

So off to the grocery I went.  I got her almost everything on her list, I told her that I might not be able to get tomatoes since they weren’t in season and even if I did they probably would not have much flavor.  I did see some organic tomatoes at the grocery, the local health food store did not have any, but they did not look “good” so I passed on them – Stella was fine with that.

Salad To Go

Salad done

Items Needed

Salad ingredientsQuart mason jar or other container with a lid for salad and one for dressing
Salad mix
veggies or your choice (avocado, mushrooms, carrot, avocado, sesame seeds, broccoli, cheese, cucumber)
Salad dressing (we made our own, again a later post)
Old sock

1. Fill your jar about half way with salad greens.

Salad lettuce

2. Cut or grate your veggies and add to the jar.

Salad carrot

Salad mushroom

Salad avocado

3. Add nuts or seeds.  Stella used crispy sunflower seeds, you could also use sprouted seeds.  I soak and dehydrate our nuts and seeds – to find out how and why to do this, go here.  For sunflower seeds soak for 7 hours and then dehydrate for 12 – 24 hours, turning occasionally.

4. Grate or cut up some cheese to add.

Salad cheese

5. Fill a small jar with salad dressing.  Cover both jars and pack into your lunch bag.  Simple and delicious lunch.

Lunch ready to be packed in bag!

Lunch ready to be packed in bag!

If your child is taking this to lunch and you want to make sure there are no injuries from broken glass (that lunch bag gets banged all around) – cover the jar with an old sock.  This will help protect the jar on its journey to school and in the locker and if it does break the glass will be captured by the sock.

Salad sock


Digiprove sealCopyright secured by Digiprove © 2015
Posted in Kids Cooking, Recipes, Salads | Tagged , , | 2 Comments

Broccoli & Almond Soup

I love soup and it seems to be even better when the weather is cold.  Stella has never been much of a soup person, but that is changing – yeah!!!  She is open to trying more soups and even better is she is liking most of them.  She was at our neighbors house and they had some mushroom soup – she was too sure about that, but gave it a try – came home and wouldn’t stop talking about it – telling me I had to get the recipe and make it!  The recipe is coming for that one.

When I came across this recipe in one of my cookbooks – I wanted to give it a try.  The thing that pushed me over was the fact that it has almonds in it and that means protein.  There are 20 grams of protein in 1 cup of almonds – in my quest to get more protein into Stella this would work, but would she like it?  That is always the question.

Broccoli & Almond Soup

BAS done

Ingredients

2/3 cup ground almonds or almond meal
1 1/2 pounds broccoli
3 3/4 cup stock (chicken or veggie)
1 1/4 cup whole milk (preferably raw)
Sea salt and pepper for seasoning

1. Preheat the oven to 350 degrees.

2. Spread the ground almonds evenly on a cookie sheet and toast in oven for about 10 minutes or until golden brown. You may want to toss the browning ground almonds, so the edges don’t burn. Reserve 1/4 cup for garnish.

BAS almonds1

BAS Almonds2

3. Cut up the broccoli into small floret and steam for 6 – 7 minutes or until tender.

BAS broccoli 1

4. Place the broccoli, the ground almonds (not the 1/4 cup set aside), milk and broth into a blender and puree.  Season to taste.

BAS ready to puree

5. Take your soup, place in a pot and heat. Or just leave it in your Vitamix and heat that way.

BAS reheating

6. Serve with sprinkled ground almonds on top.  The cheese crackers go really well with this soup.

Stella LOVED the soup!!!!!

Digiprove sealCopyright secured by Digiprove © 2015
Posted in Recipes, Soup | Tagged , , | 2 Comments

Versatile Knitted Cowl

I love all the cowls that I have knitted and here is the latest one!  This one was not for me, but was a Christmas gift – I just might have to make one for myself soon.  The great thing about this cowl is that is can be a shoulder shawl or a cowl, depending on how you roll it, fold it or button it.  Any opening can be used as a button hole – so the way you put it around your neck is pretty open to what you can imagine!

Knitted Cowl (thank you favecrafts.com)

Cowl done

Items Needed

2 skeins bulky yarn (100 g/3.5 oz) (109 m/120 yds) – I used a nice organic cotton
Size US 11 knitting needles
2 buttons
Thread to sew buttons on with
Darning needle

Size

Approx 14 ins (35.5 cm) wide x 29 ins (73.5 cm) long.

Gauge

10 sts and 14 rows = 4 ins [10 cm] in stocking st.

1. Cast on 33 stitches

1st Row: (RS) *K1, yo (yarn over), K2tog (knit 2 together), repeat from * to end of row

2nd row: Knit all the way across

Repeat rows 1 & 2 until the cowl measure 29 inches, ending with a 1st row.

Pattern

Pattern


Cast off knitwise (WS).

Finishing

1. Weave in all the ends.

2. Thoroughly wet the entire cowl, ring out well or put in the spin cycle in your washing machine.

3. Stretch the cowl out and pin to a towel.

Cowl blocking1

Cowl blocking2

4. Allow to dry completely.

5.  Try your cowl on and mark the position for the 2 buttons, using the openings as the button holes. Sew the buttons on.

Cowl buttons


Digiprove sealCopyright secured by Digiprove © 2015
Posted in Crafts, Knitting | Tagged , , | 1 Comment

Kids Can Cook: The Easiest Cheese Crackers

My aunt has been making these crackers for awhile now and Stella LOVES them!  When I showed Stella the recipe and how easy they were to make, she was all for it.  These make a great snack in her lunch or after school, great with soups or great for whenever!

These are so easy, health and provide good protein.  You can use just one type of cheese or a combination of cheeses.

Easy Cheese Crackers

Cheese crackers done1

Ingredients

Cheese, grated (we used a combination of parmesan and cheddar)


1. Preheat the oven to 350 degrees.

2. Grate the cheese.

Cheese crackers grating

Cheese cracker grated

3. Drop grated cheese onto a cookie sheet, using either a tablespoon or your hands.

Cheese crackers on tray

Cheese crackers ready for oven

4. Bake for 12 minutes or until crackers to start to turn brown. Allow to cool before taking off the tray, much easier (at least for us!)

Cheese crackers done

How easy is that!

Digiprove sealCopyright secured by Digiprove © 2015
Posted in Kids Cooking, Recipes, Snacks | Tagged , , , | 1 Comment

Ginger Molasses Waffles!

There is something about ginger and molasses that makes my senses come alive!  I came across this recipe at one of my favorite blogs, Prairie Homestead, and decided I had to give it a try.  But there was one problem – I didn’t have a waffle maker, so I saved the recipe for future baking.  The problem was solved with a waffle maker being one of the Christmas presents that I received, a little hint was given.  So to the kitchen I went!

I wanted to see if I could take this recipe and instead of making it following the directions given, try soaking the flour instead.  My first attempt was a HUGE success, my second attempt – the batter was a little thicker and I only was able to make 4 Belgium waffles – I soaked the flour for almost 24 hours and I think that is where the difference was.  I didn’t mean to soak for that long, but the day got away from me and I did not make it back in to the kitchen until about 3pm.

Highly Recommend this Book!

Highly Recommend this Book!

You ask why soak your flour?  “Soaking” your flour before you bake with it has numerous health benefits, and can give baked goods a deliciously rich flavor and texture.  Sally Fallon, in her book Nourishing Traditions, sites the following benefits of soaking your flour before baking with it:
-activates the enzyme phytase, which breaks down phytic acid (phytic acid inhibits the absorption of calcium, magnesium, iron, copper and zinc)
-provides lactic acid and lactobacilli, helping to break down complex starches and proteins
-increases vitamin content
-makes the nutrients in grains more readily available
-softens whole grain flour, making it more palatable

The bottom line, soaking your flour makes your end product more digestible, readying nutrients for easy assimilation in the body.

Both Stella and me are in love with these and they are so filling that we can split one between the two of us and be full for many hours!

Ginger Molasses Waffles

Waffle done

Ingredients

1 cup organic unbleached white flour
1 cup organic wheat flour
1 3/4 cup cultured buttermilk, from grass-fed cow not pasteurized – if possible
3 tsp baking powder, aluminum free (where to buy)
2 tsp ground ginger (where to buy)
2 tsp cinnamon (where to buy)
1/2 tsp nutmeg (where to buy)
1/2 tsp sea salt (where to buy)
3 eggs, organic, free range
1/4 cup rapadura (where to buy)
1/2 cup melted, grass-fed butter
1/2 cup unsulphered, black strap molasses (where to buy)

1. The evening before, in a large glass bowl, combine the flours and buttermilk – mix well.  Cover with a cotton cloth and allow to sit on the counter for at least 7 hours.

In the evening....

In the evening….

In the morning...

In the morning…

2. Melt the butter on the stove and allow to cool.

3. Add the baking powder, ginger, cinnamon, nutmeg and sea salt to the batter and mix well.  The batter with be thick and “rubbery”.

Waffle spices

4. In a separate glass bowl combine the eggs and rapadura.  I use an old fashion egg beater. Beat until very well mixed.

5. Add the molasses to the egg mixture and beat well.  Then add the melted butter, again mix well.

Waffle liquid

6. Add the egg mixture to the flour mixture and mix well.  Once you add the egg mixture to the flour mixture you will notice that the liquid does not “melt” into the flour mixture.  You will really need to break up the flour mixture to mix the egg mixture in.

Waffle batter

7. Heat your waffle maker and add the batter according to the directions.

Waffle in maker

8. Once done remove the waffle to your plate, slather with butter and add some really good maple syrup!  Your taste buds will rejoice along with your nose – the smell in the kitchen that these great – is wonderful!

For the leftover waffles, allow to cool completely on a metal wrack and store in freezer bags, separated by parchment or wax paper.  Store in the fridge or freezer.  When you want to have one – just re-heat in your toaster oven.

~

STANDARD DISCLOSURE: In order for me to support my blogging activities, I may receive monetary compensation or other types of remuneration for my endorsement, recommendation, testimonial and/or link to any products or services from this blog.

Digiprove sealCopyright secured by Digiprove © 2015
Posted in Breakfast, Recipes | Tagged , , , | Leave a comment

Winter Dry Skin? Lotion Bars to the Rescue!

I ran into a friend at the local Health Food store and we started talking about our holiday gift making – I love to hear what others are making.  She said that she had made a bunch of lotion bars for the teachers and friends, hmmm.  I remembered that lotion bars had been on my list of things to try and this was just the reminder that I needed!

I had all the ingredients in the house, but I could not find my silicon molds anywhere!  Of course I remembered where I put them after I was done with this project!  I decided I would trying making it in my mini loaf pan.

I love using essential oil and one of my favorite for bath products in grapefruit – it is so refreshing and invigorating, which is a great way to start the day!

Awaken Lotion Bar

Lotion bar done

Ingredients

Lotion Bar ingredients1 cup shea butter (where to buy)
1 cup coconut oil (where to buy)
1 1/4 cup beeswax pastilles (where to buy)
1 tsp Vitamin E oil (where to buy)
50 drops Grapefruit essential oil, or your choice (where to buy)


1. Fill a sauce pan about 1/3 of the way with water – bring the water to a boil.

2. In a quart size mason jar place all the ingredients except the essential oil.  Stirring until the ingredients are all melted.  It will take the beeswax the longest to melt.

Lotion bar in jarLotion bar melting

NOTE: You could melt the beeswax first, add the coconut oil and then the shea butter, along with the Vitamin E oil – I will do it this way next time I make these and YES there will be many more times of making these!

3. Once all the ingredients are melted, take the jar out of the water on allow to cool slightly, not too much because it will start to harden.  Add the Grapefruit essential oil, stir to mix well.

Lotion bar melted

4. Pour evenly into your molds.  Allow to set on the counter.  Once set to speed up the hardening process move to the freezer or refrigerator.

Lotion bar setting

5.  Once they have harden remove from the molds.  I thought I might have to set the pan in warm water to get the bars out, but I just turned the pan over, banged it on the counter and they all came out.

6. I made labels for he bars and wrapped them in saran wrap for gift giving.

Lotion bar awaken

I love the way the bar makes my skin feel and the grapefruit smell is great in the mornings!

STANDARD DISCLOSURE: In order for me to support my blogging activities, I may receive monetary compensation or other types of remuneration for my endorsement, recommendation, testimonial and/or link to any products or services from this blog.

Digiprove sealCopyright secured by Digiprove © 2014
Posted in Beauty | Tagged , , , , | Leave a comment

Kids Can Cook: Vanilla Pudding

My aunt shared this recipe with us and it has become a staple in our house.  Stella can make it all on her own, which makes me happy and sad at the same time.  She is growing up and it seems to be getting faster and faster and doesn’t really need my help for much anymore.  The first time she made this, I admit it – I hovered and kept asking if she needed my help – I think I started to annoy her.

I made this recipe with cacao and we both agreed the vanilla is so much better!  This pudding forms a really great skin and the first time Stella took it all for herself – that ended really fast and now we share it.

Vanilla heels

It is very important to dress when you are going to be making pudding and that includes wearing heels!

Vanilla Pudding (original recipe from The Healthy Home Economist)

Vanilla enjoying

Ingredients

3 cups whole milk (preferably raw)
2 large eggs
1/3 cup flour
1/2 cup rapadura (where to buy)
1 Tbl butter (preferably grassfed)
2 tsp vanilla

1. In a large saucepan, combine sugar and flour and milk.  If you are like Stella, she gets all her ingredients out before she starts anything.

Vanilla sugar

Vanilla flour

NOTE: if Stella could take a bath in just flour she would! She just loves the feel of flour on her skin.

Vanilla flour 2

2. Over medium heat, cook and stir with a whisk until the mixture starts to slightly bubble – you might have to stop stirring to see the bubbles.  Once it bubbles, set the timer and cook for 2 minutes more and remove from the heat.

Vanilla ready to start cooking

Vanilla whisk

3. In a small glass bowl, beat eggs and then gradually stir in about a cup of the cooked mixture, whisk it really good when mixing.

Vanilla crack egg


Vanilla egg

4.  Pour egg mixture into the saucepan and return to medium heat. Whisk until nearly bubbly but not a boil.  Once it bubbles, reduce the heat and set the timer for 2 minutes more of cooking.

5. Remove the pan from the heat and add the butter and vanilla – stir to incorporate.

Vanilla butter vanilla

6. Pour the pudding into a glass container and allow to cool.

Vanilla done

You can serve it warm or let it get cold and form the skin!

This is thoroughly enjoyed in out house!

Remove pan of homemade vanilla pudding from heat.   Stir in butter and vanilla.

Let homemade vanilla pudding cool for 5 minutes and serve warm.

Digiprove sealCopyright secured by Digiprove © 2014
Posted in Dessert, Kids Cooking, Recipes | Tagged , , , | 2 Comments