Colorado Weekend

The peak way in the back in Hahn’s Peak – as seen on our hike

This past weekend was spent in the mountains of Colorado.  Stella and I lived outside of Steamboat Springs, CO before moving back to NY.  We lived in Hahn’s Peak on a beautiful piece of property that sat at 8600 ft!  Colorado is having it’s worse fire season on record and it has been hot and dry, but that all changed this past weekend.


The Yampa Valley

Saturday morning we headed over to the ski mountain and rode the gondola up to mid mountain for a picnic hike.  We were treated to huge views, comfortable temperatures and lingering clouds.  We stopped about half way to have lunch.  After lunch, as we were heading back to the gondola area we heard the sirens, a storm must be coming in and lightening must have been spotted.  We picked up the pace, but by the time we got back the gondola had been shut down due to weather – we could see the approaching storm coming off the Flat Tops.  We waited for the shuttle to come up from below.  By the time we made it back down to the bottom the storm had hit.  The really nice thing about storms out in Colorado, at least in this area is that they are usually followed by a rainbow – and we were not disappointed!

Hiking the mountain

Storm coming

Rainbow


The rain let up enough for us to decide that we should head over to the rodeo.  Steamboat Springs in part of the Pro Rodeo circuit 
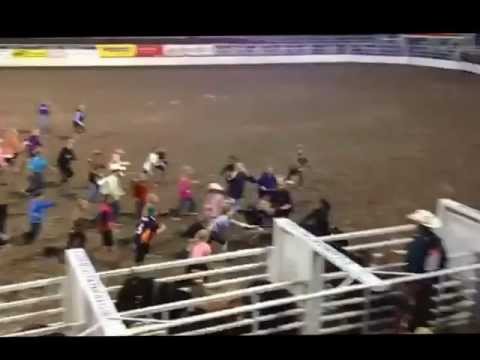
and every Friday and Saturday night for most of the summer the rodeo is in town.  We were able to find some seats in the covered area and just in time because the rains came on heavy!  No one complained – the rain was needed, but it was a muddy arena for the cowboys and animals!  One of the really fun things they have during the rodeo is the calf scramble and the ram scramble.  In between events the kids all go down into the arena and they chase a calf and try and get the ribbon off the tail and then a little later in the night they do the same with a ram.  The kids all looks forward to it and this time what made it all the better was the rain and the mud – Stella had some much fun, was covered in mud and even got some in her eyes!

YouTube Preview Image

Sunday was a day spent in the pool and then a great lunch along the river – until the rain came again – with thunder and lightening!  It is always nice to get away and it makes coming back home all the better!

Digiprove sealCopyright secured by Digiprove © 2012
Posted in Life, Outings | Tagged , , | 3 Comments

Blueberry-Banana Muffins – YUM!

With blueberry season in full swing, I have been experimenting with some new recipes.  I still have about a bag of frozen blueberries left from last season, so before adding more wanted to use some of the fresh berries -I also had some bananas in the freezer I wanted to use!  Looking around the house as to what I had on hand – this is what I came up with – there was some tweaking after the first batch came out!  The first batch was cooked all the way through, but very, very moist, delicious,though – after making a few adjustments the rest were perfect and the kids inhaled them!

Blueberry-Banana Muffins

Ingredients

3/4 cup unsalted butter (room temperature)
3/4 cup organic sugar
1/2 cup agave nectar
3 organic eggs
2 tsp vanilla (preferably homemade)
1/2 cup buttermilk
1 1/4 tsp baking soda
1 Tbl + 1 1/2 tsp baking powder
1/2 tsp salt (only if using no salt butter)
1 Tbl cinnamon
1/4 cup flax meal
1/4 – 1/2 chia seeds (optional)
1/2 cup coconut flour
2 1/4 cup flour (I used a combination of sprouted and wheat flours)
Cacao powder (optional)
4 ripe bananas
1 – 2 cups blueberries (depends on you!)

I know it is a lot of ingredients – but needed all of that to make some yummy muffins!

1. Cream butter, sugar and agave nectar together.

2. Beat in eggs, buttermilk and vanilla.


3. Blend in the dry ingredients (flax meal, chia seeds, flours, salt, cinnamon, baking soda and baking powder). I did the chia seeds last, since they tend to end up everywhere – so I am carefully mixing them in.

4. Mash the bananas in a separate bowl and then add to the mixture.  Fold in.

5. Add the blueberries – fold in gently.

6. Preheat the oven to 350 degrees.

7. Place muffin papers in muffin pan – fill to 3/4  full.  Cook for about 20 minutes.  Check by sticking in a toothpick – come out clean – they are done.

8.  Towards the end of the batter I added some cacao powder to make chocolate, blueberry – banana muffins!

9. Cool on a rack.  After they were completely cooled I placed in a freezer bag and placed in the freezer. This made about 36 muffins.  When we want one or two, we take them out of the bag and within about 15 minutes they are defrosted, one of the good things about the heat!

Digiprove sealCopyright secured by Digiprove © 2012
Posted in Bread, Dessert, Recipes, Snacks | Tagged , , | 2 Comments

How To Make A Reusable Wine Bottle Carrier

I have my favorite wine shop in town, Riverview Wine.  The owner is great, their wine selection is ecclectic and they have great tastings.  My regular canvas bag is fine when I am buying one bottle, but when I am buying two I usually have to use one of their bags and then reuse when walking the dog.  I wanted to make a bag that I could use for my wine purchases and would accomodate 2 bottles.  I was going through the bag of items I saved from our yard sale and came across a lace table runner – the light bulb went off!

Table Runner Wine Carrier

Items Needed


Table runner ( one that is wide enough for 2 bottles of wine)
Sewing machine
Matching thread
Wine bottles
Scissors


1. Fold the table runner is half, lining up the short side edges.  Measure from the short edge the length you would like the bag to be, but remember that you will have a bottom.  I measured 15″.  Pin short edges together and cut the runner.  The leftover piece will be used later so set aside.


2. Pinning the pieces together, right side to right side and sew together.  You will now have 1 long piece.  My runner had lace trim – so I sewed together the edges that did not have lace.

3. Now to make the bottom of the bag.  Match the tops of bag together, wrong side to wrong side (I did this, again, because of the lace edging) and pin together, top and sides.

4. I am not sure how to really explain this, but I will do the best I can.  I wanted my bottom to be about 3″ across.  Taking the seam, push up inside the bag about 1 1/2″ (this will form a hand puppet like mouth). Pin the sides.

5. Sew the bottom seams together.  I had to do this is two parts.  Sewing the new seam on each side of the bottom seam separately.  I hope this is not as confusing as it is seeming as I am writing this and I hope the photos help.


6. With the bottom of the bag done, you need to sew the side seams.  I did this as close to the edge as possible.


7. Place 2 bottles of wine inside the bag.  You want to determine where the middle seam will be, this is so the bottles don’t hit one another as you are walking.  You want to make sure that the bottles get home in one piece.  Mark the center.  Take the bottles out.

8. Sew the middle seam.  Start from the top and go almost to the bottom of the bag.


9. Take the leftover fabric and make your strap.  I decided I wanted one strap. I cut the lace off the fabric and then cut the fabric in half. Taking the cut fabric I cut it is half.  Sew the pieces together.


10. Once your strap is sewn together, you want to finish the sides.  Turn the fabric over about 1/4″ and sew. Repeat on other side.


11. Sew your strap onto the bag.  I chose to sew it where the sides were sewed together.  To make it extra strong I sewed in a square.


Digiprove sealCopyright secured by Digiprove © 2012
Posted in Crafts, Recycled, Repurposed, Sewing | Tagged , , | 2 Comments

Fritelli – Fried Squash Flowers

I blogged about this last summer – but this summer I was fortunate to make them with my neighbor and get the recipe – yeah!!!  These are so delicious – I could probably eat them until I am sick.  I have seen recipes for fried zucchini squash flowers, but never like my Italian neighbor makes.  Last year when she would send a plate over or some batter for me to make my own batch – they were all for me – Stella would not try them.  This year not so lucky.  After making these with my neighbor, I came home with a plate full and was looking forward to having them for dinner with a salad – well, Stella ate some along with her friend Bella and my other neighbor and her niece had to try them.  Bummer for me, but glad others were willing to try something new and they all LOVED them!

Fritelli (Fried Zucchini Flowers)

Ingredients

About 20 zucchini squash flowers
2 cups flour
3 eggs
1 cup parmesan cheese
3/4 cup water
Salt for season and washing
Pepper to taste
Garlic powder to taste
Fresh basil and parsely (from the garden, perfect) to taste – we like a lot
Oil for frying (coconut, preferable)

1. Pick the flowers – this needs to be done first thing in the morning, when they are open.  At night the flowers are closed.  You can pick over a couple of days – just store the flowers in a zip lock bag with a paper towel (to absorb the moisture).


2. Take the center out of the flower.


3. Cut up the flowers and place in a large bowl.  Fill the bowl with water and salt – this will wash and pull any dirt from the flowers.  Let sit for about 10 minutes – stir/mix around several times.  Drain water.

4. In the same bowl – make the batter. Add the flour, eggs, water, parmesan cheese, salt, pepper, garlic and then tear up fresh basil and parsley.  Mix well.  You want the batter to be similar in consistency to pancake batter.  You may need to add more flour and or water in order to get to the desired consistency.  I love making with a little of this and a little of that!

Adding flour & eggs

Mixed

Adding cheese


Water added

Add parsley and basil

Batter ready


5. In a large frying pan, heat the oil – about 2″ deep.

6. Spoon the batter in, turning to brown both sides.


7. When done place on a paper towel/bag lined plate to drain the excess oil.

Enjoy – this are wonderful hot, room temperature or cold.  Once you make these once – you will continue year after year and look forward to those flowers on your zucchini plants!!

Digiprove sealCopyright secured by Digiprove © 2012
Posted in Dinner, Recipes | Tagged , | 4 Comments

KidS Craft Corner – Nature Imprint Cards

There are so many things blooming in our yard and all around.  Last fall we picked some flowers and leaves to press and will be doing a project with them soon and I might have to start pressing some now for a fall project.  But we wanted something that we could do now and not have to wait – so we decided to do flower and leaf imprints on paper and make them into cards.  Out to the garden we went….

Flower and Leaf Imprint Cards (the idea came from http://buildmakecraftbake.com/2009/04/how-to-hammered-flower-and-leaf-prints.html )

Items Needed

Flowers and leaves – get many because not all with work
Paper (good drawing or painting paper)
Paper towel
Hammer or rock hammer
Scissors

1. Go to the garden or for a walk and collect flowers and leaves – the more colorful the better.

2. Fold the paper in half so you can determine where you want to place the flowers and leaves. Note: that the flowers and leaves can “leak” so place a piece of scrap paper underneath.

3. Lay the flowers and leaves out on your paper.  Stella decided to do one at a time.  Some of the flowers we had to cut the stem way down and then lay the petals out.


4. Place a piece or several of paper towel over the flowers and leaves.

5. Hammer over the flower and/or leaves to make am impression. Not all will work

Stella hammering

This leaf did not work

Me hammering


6. Pull the paper towel off, carefully and then peel the flower and/or leaves off the paper – allow to dry.

Flower and leaves used

Flower hammered, before taking off

Flowers taken off, imprint


7. Write your message on your card. (Grandma Jo – if you are reading this, act surprised when you get your card!)

Digiprove sealCopyright secured by Digiprove © 2012
Posted in Kids Crafts | Tagged , | 3 Comments

Tent, Friends, Great Weather – Priceless Weekend

I love to camp and so does Stella and when her friend Bella’s mom, Lisa, said why don’t we go camping this past weekend – I jumped at it.  Bella’s sister and dad were away at a soccer tournament so it was just us four girls!

We left Friday afternoon and drove about 2 hours north.  We arrived at our camp site about 5:30, set up camp and then headed to the pond to cool off – which was much needed after the heat we have been having!  Back to the campsite for a quick dinner and then to the main campground lawn for playing on the playground, kids movie and a bonfire.  The kids played and Lisa and I sat by the bonfire and visited.  About 10 we put our jams on and climbed into our sleeping bags and were serenaded by many bull frogs!  The sky was cloudy so we did not get to see any stars.


Saturday we got up, made breakfast and headed into Hudson – Bella had switched shoes and did not have sneakers for hiking – so we needed to get her a pair.  Then we went for a nice hike in Greensport Conservation Area and some lunch.  We weren’t expecting rain, but it started – not much, but enough that we opted to pass on the next hike and head back to camp – since we did not have the fly on the tent and we did not want to sleep in wet beds!  Of course it had not rained at the campsite!!  The campground was having a carnival like weekend – so the girls had a blast doing the blow up obstacle course, the water slide and the dunk tank!

Our last night we cooked salmon on the camp stove, but our vegetables over the open fire.  The fire pit was too small for the wood – so it was an endless struggle to keep the fire going, but enough to roast some marshmallows.  We were serenaded again by bull frogs and as we were chatting, Lisa noticed the stars were out – so we got up and took the fly off the tent – great decision – the stars were spectacular and we were able to see Venus!


Our last day, we packed up the site and headed to Bash Bish Falls.  This was about a mile hike in and we went from New York to Massachusetts and ended up at a fabulous waterfall.  We climbed down to the pools and the girls were brave enough to get in the very cold water!  We hung out for about an hour and then hiked out – but before we headed back home we went to the over look and were treated to an incredible view of the valley.  There was a man playing the guitar and writing music – he was kind enough to let Stella play us a song.


It was a great weekend where lasting memories were made!

Digiprove sealCopyright secured by Digiprove © 2012
Posted in Outings | Tagged | 6 Comments

Kids Can Cook – Chocolate Mousse

Continuing on our quest for yummy raw food desserts – I came across this recipe at Garden of Life.  After seeing the ingredients – we had to try it and see if it really tasted like chocolate mousse – OMG – it is delicious!! We ate some outside and our neighbor asked Stella how her chocolate pudding was and she said it wasn’t chocolate pudding – so of course they said then what is it?  She wouldn’t tell them – so I gave them a small bowl, they tasted, loved it and then I told them what was in it – they couldn’t believe it.

Chocolate Mousse

Ingredients

1/2 cup Medjool dates, soaked
1/2 cup raw honey (I am going to try and use less next time)
1 tsp vanilla extract (optional – but we used our homemade)
1 – 1 1/2 cups mashed avocado (about 2 – 3 avocados depending on size)
3/4 cup raw cacao powder
1/2 cup water


1. Take the pits out of the dates and place in a glass measuring cup, add water and allow to soak.  We soaked for about 15 minutes since they were very soft to begin with.


2. Add the dates, raw honey and vanilla in a food processor and process until smooth.


3. Mash the avocados and add them to the date mixture along with the cacao powder. Process until creamy, stopping to scrape the sides.

4. Slowly add that water and process until rich and creamy.

5. Place into a glass bowl that has a cover and place in the freezer of fridge to chill.  Can be eaten at room temperature, but we think it is better cold.

This would make great fudgesicles – but I am not sure I could eat a whole one – would have to cut the sweetness.

Stella thought this was great fun to make and kept checking on the smoothness. Everyone that has tried this can not believe what it is made with and thinks it is just wonderful!

Digiprove sealCopyright secured by Digiprove © 2012
Posted in Dessert, Kids Cooking, Raw Food, Recipes | Tagged , , | 4 Comments

Easy To Make Ahead Beef Burritos

This post is compliments of my aunt.  We are mostly a vegetarian household here, but we do eat fish.  I have thought about adding meat back into my diet, but I cannot convince Stella to do the same -therefore, we do not eat meat – I just don’t have the time to spend making different meals for the two of us.

My aunt is one of my biggest supporters, sending me articles, recipes, ideas and inspiration.  Over the years I have admired her for her accomplishments, her commitment to her beliefs and just for being her!  I have learned and continue to learn so much from her – thank you!!!

Beef Burritos

Ingredients

Tortilla wraps (preferably sprouted and very few items on the ingredients list)
Organic Brown rice (can use leftover, 1 – 2 cups cooked)
Sprouted lentils (see this post, but only do to about day 2)
1 – 2 lbs grass fed hamburger
1 – 2 lbs raw milk cheddar cheese
Coconut oil
Sea salt
Spices (your choice)

1.  If you are not using leftover brown rice, you will need to make that first.

2. Mix the brown rice, sprouted lentils, a mixture of seasonings (crushed red pepper, sea salt and pepper) and 2 Tbl coconut oil.  Cook and let cool.

3. Prepare the hamburger to your liking.  This recipe used coconut oil, crushed red pepper, sea salt and pepper.

3. Grate the cheese.

4. Set up your assembly line – depending on size of tortilla, you can cut in half.

5. On a sheet of aluminum foil, place wrap, rice, hamburger and cheese and roll. To roll – roll once, then fold sides in and continue rolling – then wrap tightly in aluminum foil.

6. Once you are done wrapping all your burritos, place on a cookie sheet and place in the oven for 15 minutes at 325 degrees, this melts the cheese and get the ingredients to “bond”.

7. Cool and either refrigerate or freeze. If refrigerating the burritos will stay “good” for up to 10 days.

8. If you freeze – when ready to eat, place in toaster oven at 325 degrees for 45 minutes or thaw and cook (same temperature) for 15 minutes.  To get the wrap crispy, take the foil off and toast for a few minutes.

Digiprove sealCopyright secured by Digiprove © 2012
Posted in Dinner, Recipes | Tagged , , | 4 Comments

Make A Picture Memory Box

Recently in an answer to a post comment – I said that I didn’t think I would end up the weird cat lady on the street, but the weird craft lady!  I think it is already happening.  Our neighbor, who is also our pet sitter and Stella sitter,  wanted to make a memento for her boyfriend’s mother.  When I had been at their house, she had showed be the shadow box she was going to use and her idea of how to fill it – I of course, made a few suggestions and said if you need some supplies come on over.  Two night later she came over and for almost 3 hours we printed, cut, glued, rearranged and contemplated… it turned out fabulously!

Picture Memory Box

Items Needed

Photos
Shadow box
Glue
Patterned paper
Ribbon, beads, flowers
Glue gun and glue sticks
Cardboard
Scissors (we used design scissors)
Toothpicks
Exacto knife

1. Decide on what photos you want to use and print them – I would suggest printing more than you will use – just because you never know.

2. We decided to cover the cork on the inside with some scrap booking paper – just glued on with white glue and trimmed with an exacto knife.

3. Now to lay out the photos and decide on how many and which ones.

4. Using ribbon – make a border around the inside – the trick here is to make sure that you can see it when you shut the lid.  We laid out the ribbon, closed the top and then stood on a chair to look down on it (like we would be looking at it when hanging on the wall) – moving the ribbon around until it was just right.  We glued on using white glue – the top and bottom strips went on first and then the sides.

5. Next was deciding on what paper to use and the background for the pictures.  We decided on two different papers.  One paper was for the pictures that were going to have a bead border and the other paper was for the pictures that were going to be raised. We cut the paper with the fun scissors and then glued the pictures on.

6. Next was bordering the pictures with beads.  This looks harder than it was – the beads are attached to a sticking back in a strip.

7. To make the stands for the raised pictures – cut small pieces of cardboard (we used 3 pieces high).  Glue the pieces together and then place in box as to where you want them.  We used two stacks per picture – but I have to make a disclaimer – the next day the pictures had started to droop – so either use for cardboard towers and place at corners or do what Lina did – she placed toothpicks at each corner to hold up.


8. Taking some plastic flowers, cut the flowers off – as close to the flower as possible. Decide where you want them on the box and glue using the glue gun.


Now stand back and admire your work!

Digiprove sealCopyright secured by Digiprove © 2012
Posted in Crafts | Tagged , | 3 Comments

Blueberry & Strawberry Jam Recipe

As mentioned, we go blueberry picking several times during blueberry season.  I try to have about 30 pounds of blueberries in the freezer to get us through to the following season.  We use the blueberries in smoothies, on and in our pancakes, on our oatmeal, for baking and eating – frozen blueberries hit the spot.  The beginning of the blueberry season also fell in line with the end of the strawberry season this year.  I cannot eat any berries with the seeds on the outside, a real bummer, but Stella LOVES strawberries.  We picked up some strawberries from a local farm and I decided to give it a go at making blueberry, strawberry jam.  Could not find a recipe to follow – so using the basic jam making guidelines came up with our own recipe.  This one is a hit.  We are also a little behind in our jam naming – still don’t have a fun name for the cherry preserves we made a couple of weeks ago or this one!  Any ideas send them along!

Blueberry & Strawberry Jam

Ingredients

6 cups of cut/mashed fruit – any combination, just needs to equal 6 cups total
Pectin (a little more than one box or 7 Tbl from jar)
2 cups of sugar
1/4 lemon juice

Items Needed

6 – 7 Half pint canning jars
Jar lids
Jar grabber
Funnel
Spoon/ladle
2 large pots
1 small sauce pan
Immersion blender or Foley mill


1. Wash the jars and lids in soapy water and then place the jars into a large pot, fill with water and bring to a boil – this will sterilize the jars.  You can do this step with a dishwasher, but I do not have one.  Once the jars come to a boil – let boil for about 5 minutes and then turn the heat off, keep lid on. Place the lids in a small pot and fill with water – set aside.


2. Wash the strawberries  and cut them up into a glass bowl.  Using an immersion blender – blend the strawberries.  I like to have chunks of fruit in my jam, but blend to the consistency you prefer.  Place the pureed strawberries into a glass measuring cup.


3. Wash the blueberries and place in a glass bowl – puree with an immersion blender.  Place the blueberries in the measuring cup.  You want to have 6 cups of fruit total.  I did all the strawberries we had and then made up the difference with blueberries.

4. Mix about 1 1/4 box of pectin with a 1/4 cup of sugar in a bowl.  You want to mix the pectin with sugar to prevent clumping.  I buy my pectin in a large container – so I used about 7 Tbl.

5. Place a metal spoon in the freezer.
6. Place the fruit in a large pot, add the pectin and sugar mixture and  lemon juice – this is to help with the acidity level.  Bring to a hard boil (when you can’t stir the bubbles away).

7. Turn the heat down to medium and add the remaining sugar.  I chose to use very little sugar – total 2 cups – but you can use up to 4 cups.  The fruit to me is already sweet.  Bring the mixture back to a boil – the slower you do this the less foam will form.

8. Place the pot with the lids on the stove and bring the water to almost a boil and then turn off water.

9. Take the jars out of the water and place on a dish cloth lined counter top.  Get your funnel ready.  Also take the lids out and place on dish towel.

10. Place the lid back on the pot of water that the jars were in and turn the heat on to get the water bath ready.  You want the water boiling when you put the jars back in.

11.  Once the preserve mixture has come to a boil again – then you are almost ready.  Take the spoon out of the freezer and scoop a little of the mixture onto the spoon – let cool to room temperature – if the consistency is to your liking – turn the heat off – if not wash off the spoon stick back in the freezer, add a little more pectin to the mix, stir and let cook for a few minutes more – then test with spoon.

12. Using the funnel and ladle – fill jars to about 1/4″ from the top.

13. Wipe off the tops of each jar – you want a clean surface.   Place the lids on each jar and then place ring and tighten.

14.  Using a jar grabber, place each jar back into the boiling water and place the lid back on.  Allow to boil for at least 5 minutes (according to Clemson University), but I usually do for 10 minutes.

15. Take the jars out and place on dish cloth.  Listen for the pop – this is the jar sealing.  If the jar does not seal – turn upside down and allow to sit like that for about 15 – 20 and the jar should seal – if not that is the jar that you will use right away.

Digiprove sealCopyright secured by Digiprove © 2012
Posted in Canning, Preserving | Tagged , | 3 Comments