Festive Felted Pumpkin

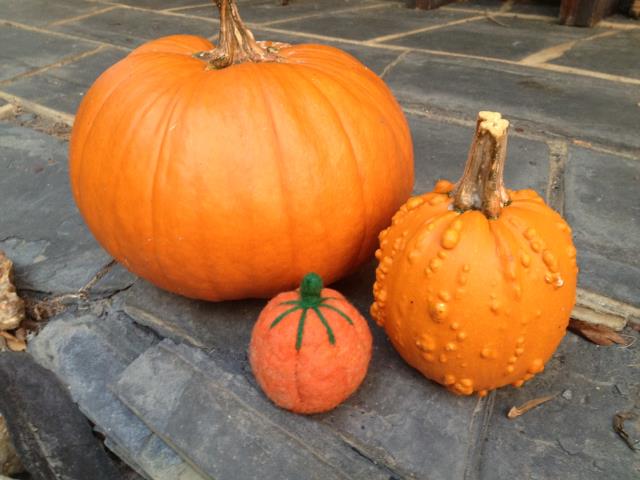
I can’t believe that Halloween is this week!  With all our property projects we have been too busy to spend too much time on Halloween craft projects or any craft projects.  The other night I was feeling the urge to be a little more creative.  Not that all the cooking and land projects aren’t creative, but I needed something more and different. I was feeling the pull to do some needle felting and I thought why not felt a pumpkin to add to the other pumpkins on the front porch!

Halloween Felted Pumpkin

Felted pumpkin done

Items Needed

Wool batting
Orange wool roving
Green wool roving
Felting pad
Felting needles

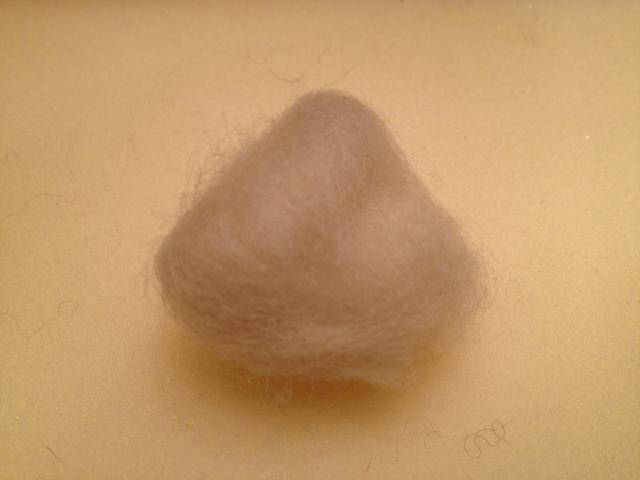
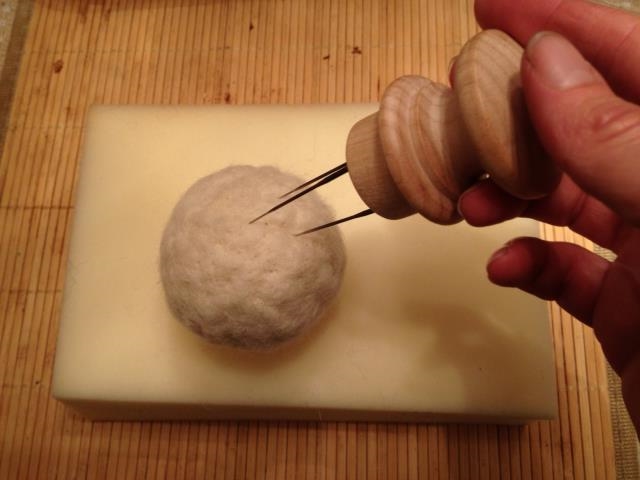
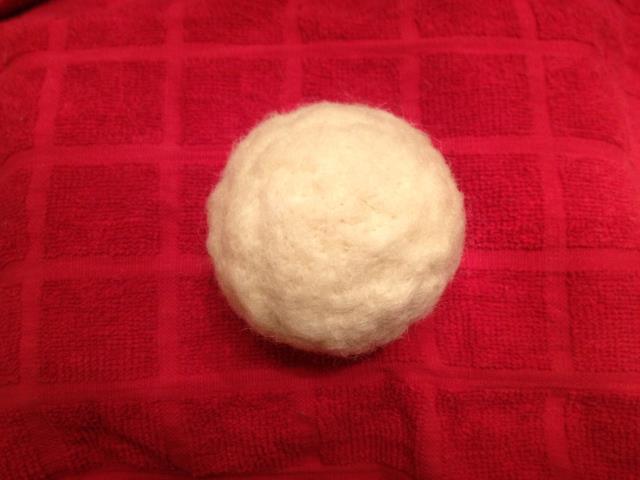
1. With wool batting, take a small amount and bunch into a ball.  With your needle start felting.  When the ball feels firm, wrap more batting around and felt again – repeat this until you have the size you want.

Felt Pumpkin battingFelted pumpkin felting battingFelted pumpking inner done

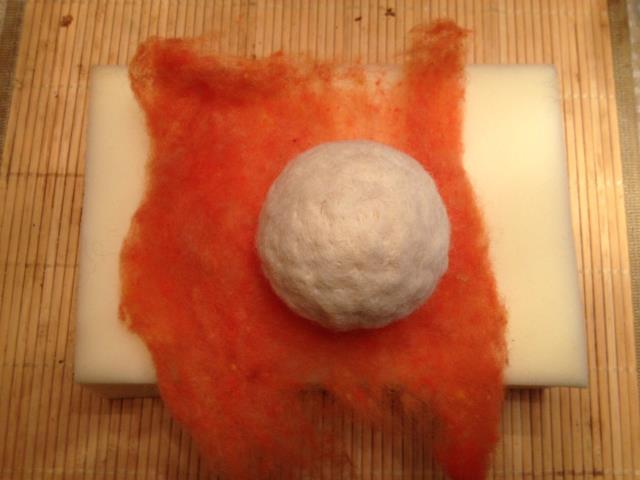
2. With orange wool roving, wrap your ball and felt the orange onto the ball.  You may need to do this step one or two more times – you want the ball covered in orange with no batting color showing through.

Felted pumpking orangeFelted pumpking orange feltFelted pumpkin orange done

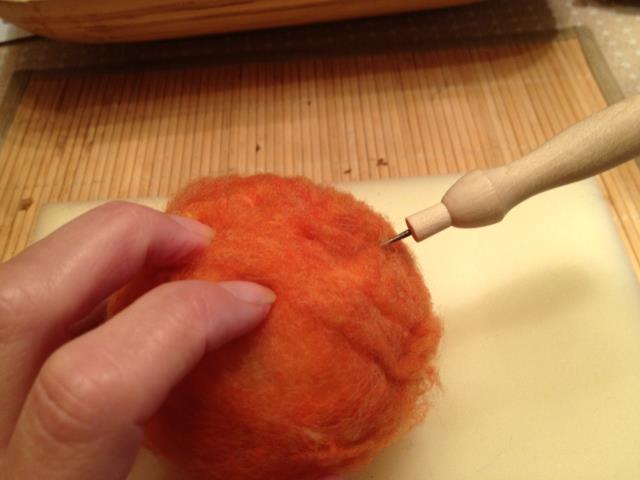
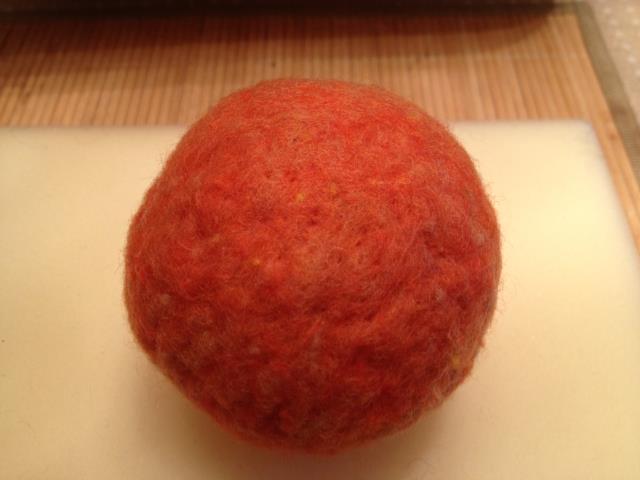
3. If your pumpkin does not sit well, take your needle and felt the bottom until it is flat and sits to your liking.

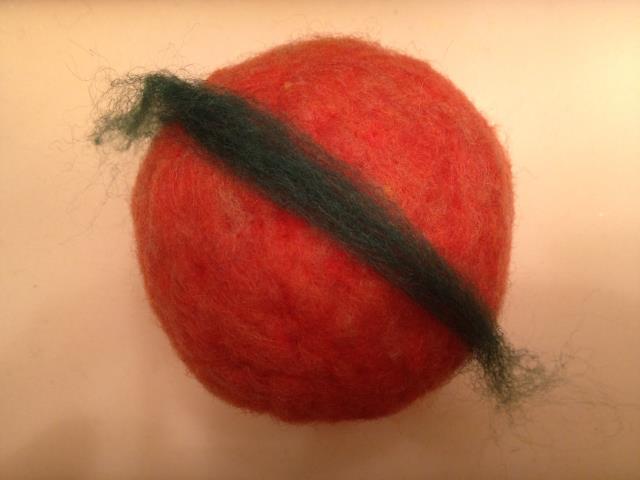
4. With your green batting, pull a small amount – lay across the top in a line and needle felt on.  Do this so that you have anywhere from 4 – 8 “stem vines”.

Felted pumpking greenFelted pumpkin stem root

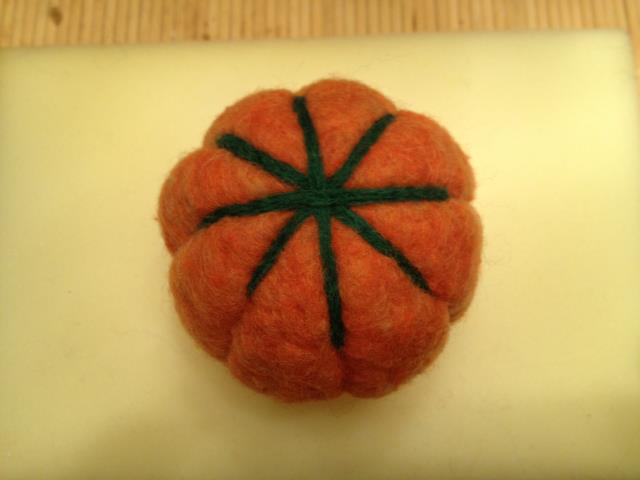
5. Continue following the line from the “stem vine” down the sides of the pumpkin to add the ribbing.

6. Now you are ready to make the stem.  Take some green wool roving – fold over and needle felt until firm.  Your stem can be as long or short as you want and if you want you can make it bend.  To make it bend – needle felt a lot where you want the bend to be – the more you felt the shorter the wool gets creating the bend.  Place the stem on the top of the pumpkin and using your needle felt all the way around – until it is firmly attached.

Felted pumpkin stemFelted pumpkin stem done

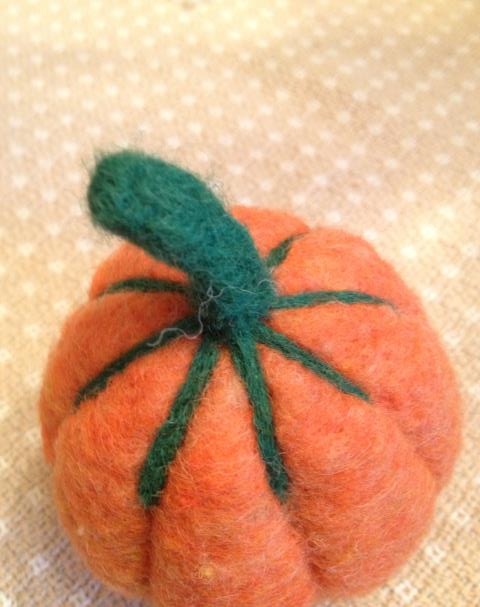
This is the cutest little pumpkin and it did not in any way feel inferior to the other pumpkins!

Digiprove sealCopyright secured by Digiprove © 2013
Posted in Crafts, Felting | Tagged , , , | 3 Comments

Expanding The Grape Arbor

As I mentioned in the cold frame post – part of the weekend projects when my cousin came to help was to expand the grape arbor.  I will admit right from the beginning, even though I was there throughout the process, at the same time I was preparing dinner for 8 people and did not remember about pictures until the next morning – when it was pretty much completed!  Ugh – I really do not like it when I do that – but I will be good about walking you through the steps and showing the finished described step.

Arbor vine in treeI have three grape vines, but since our home was a second home – the yard was not kept up fully.  To top that off – two summers ago Arbor grape vinea bear attacked the arbor and did some damage – so for the rest of that summer and this past summer the vines were going up the tree.  I will be cutting the vines and redirecting them to the expanded arbor – but it will be a good two years before it fills back out and I get a harvest – but it is worth it!!  Best grape juice and jelly from concord grapes.

If you have grapes or are wanting to get some – this is a simple design to expand your arbor and build the beginnings of one.  The great thing is that it does not take great carpentry skills to do it! Now I am very grateful that my cousin who is an amazing carpenter came to help me – but this is a very simple design.

Building or Expanding A Grape Arbor

Arbor done

Items needed

8ft garden posts (can be the 2ft round size)
2x4x8 wood
Wire – gauge
Eye screws
3″ exterior screws
Post digger
Post hole digger bar
Shovel
Table saw

1. Since I have three (3) main post in the existing arbor – I decided I would build off of that.  Measuring 6 feet from each post – dig holes about 2ft deep.

2. Place a post in each hole, having someone else hold them straight is a HUGE help.  Fill with dirt and then using your post hole digger bar – pound the dirt in – making sure the post is secure.

Arbor post

3. Cut 3 “T’s” from the 2x4x8 pieces of wood, each “T” measures 3 feet.

Arbor T

4. Secure you “T” to the top of each post using your 3″ exterior screws.

5. Because of the distance between the original posts of the arbor – we decided to run wire to each “T” instead of use hog wire.  The reason for this is that it would have been too difficult to harvest the center.

6. Screw your eye screws into each “T”, we did 5 per “T”.

7. Taking your wire, secure one end to the original arbor posts or wire and then secure the other end to one of the eye screws.  We twisted the wire to secure, but if you wanted you could use wire clamps to secure.

Arbor wire on t

8. To make it even more secure and able to hold the weight of the grapes – we secured wire between each new post, using the end eye screw on each post to secure to each other.

Arbor wire between

9. The next step would be to move your grape vines along the new wire supports.  Since most of the vines I have are going up a tree – I decided I would cut most of the vine from the tree – but was hoping to be able to “save” some of the vine – therefore I am waiting for more of the leaves to fall from the tree.

Once I have pruned the vines and re-directed to the new part of the arbor – I will keep helping it along as it grows.  Once the vines are healthy and really growing on the new part of the arbor, if I need more space I will just extend down the hill another 6 ft and follow the directions from above.

I researched all kinds of plans for the arbor and most were far more elaborate than I wanted – so we came up with our own design.  One of the big factors in the design of the addition to the arbor was that I am trying to take over the hillside of grass and now the grapes will be a part  of that and if I get really ambitious I can add more vines and take over even more of the hillside.

Digiprove sealCopyright secured by Digiprove © 2013
Posted in Building, Crafts, Homesteading | Tagged , , | 2 Comments

Cleaning A Burned Pot

I am still trying to get used to cooking on an electric stove – it has been many, many years since I have.  Trying to figure out the temperature settings on each burner is the tricky part.  There is my big stock pot, that no matter what I do I end up burning part of the bottom, ugh.  I am thinking I need to invest in another stock pot with a very thick bottom.  After scrubbing it after each and every time I used it – I thought there has to be an easier way – and there is!

How To Clean A Burned Pot

Burned pot cleaned

Items Needed

Burned pot
1 cup Vinegar
Water
2 Tbl +Baking Soda
Brillo type pad

Burned pot ingredients

1. Get as much of the burnt part out of the pan.

Burned pot

2. With water, enough to cover the bottom add 1 cup of vinegar.

3. Place the pot on a burner and bring to a boil – you will see the pan start to clean itself.

4. Take the pot off the burner and add 2 Tbl of baking soda – it will fizz.

5. Empty the pot and scour as normal – you may add some dry baking soda to help with the scouring.

Burned pot almost clean

6. If you have an exceptionally burned pot, like I did, make a past with baking soda and water and cover the burned spots with the paste.  Let it sit for awhile.

Burned pot paste

7. Scrub the burned spots with a brillo type sponge and the paste.  Wash and rinse.  Clean pot!

Digiprove sealCopyright secured by Digiprove © 2013
Posted in Cleaning | Tagged , | 2 Comments

Love Me Some Lentil Soup!

I love lentil soup!  It is a comfort food for me.  When we were living in NY, less than a block away was a Greek restaurant that made the best lentil soup I have ever had. Whenever I was feeling low I would treat myself to a cup – yum!

I have been experimenting with different recipes and I like this one because of the bacon, but I still think it needs something else – experimenting will continue on!

You should really soak your lentils at least overnight – which I did with some vinegar in the water, but for some reason this batch of lentils just did not want to cook – I ended up simmering the soup 2 hours longer than the recipe called for – maybe it was a change in the weather system here – not sure.

Lentil Soup (serves 8 – 10)

lentil soup served

Ingredients

2 cups dried lentils
1 Tbl apple cider vinegar
8 cups water (for soup)
2 slices bacon, diced
1/2 cup chopped onion
1/2 cup chopped celery
1/2 cup chopped carrots
2 gloves garlic, minced
2 1/2 tsp sea salt
1/4 tsp ground pepper
1/2 tsp dried oregano
1 (16 oz.) can diced tomatoes
2 Tbl wine vinegar

Note: This recipe called for bacon diced – because of the wording, I diced uncooked bacon figuring that it would cook with all the simmering.  The bacon bits are good in the soup, but next time I would cook the bacon (not to crispy), crumble it into the soup along with the bacon fat to add more flavor.

1. Place the lentils in a large bowl and cover with at least 4 cups of water, add the apple cider vinegar.  Cover and let soak for at least 12 hours.

Lentils soaking

2. Rinse the lentils and place in a large soup pot.

3. Add the water, bacon, carrots, onion, celery, garlic, salt, pepper, and oregano.  Cover and simmer for 1 1/2 hours.

Lentil ingredientsLentil all in

4. Add the diced tomatoes and the juice, along with the vinegar, cover and simmer for another 30 minutes.

Lentil tomatoes added

5. Season to taste.

Serve with some nice bread and you have a wonderful meal. Stella is just coming into soup and last year I found that I needed to puree all the soups I made for her – this year, so far she has enjoyed all the soup I have made! This one was a hit with her especially with some toasted sourdough bread!

Digiprove sealCopyright secured by Digiprove © 2013
Posted in Recipes, Soup | Tagged , , | 2 Comments

Building A Cold Frame

This past weekend my cousin came to help me with some projects – I was so excited!  I had three projects that I wanted help with and was not sure we would get them all done but we did!  We were able to finish up the garden fencing and hang the gates – I just need to put the fencing over the gate openings, we re-did the grape arbor (future post) and were able to get 2 cold frames built.  Another project that was not on the list, but was a much needed one – was figuring out why the wood burning stove was not pulling as it should… the reason?  One of the pipes was pretty much gone – so a new pipe was put on and it is drawing much better – yeah!!!

I am one that always looks at something that is no longer of use in its original purpose as to what it can now be used for.  When I first moved into this house – the tub had glass shower doors – those came off immediately and they were stored in the basement for the future.  The first future I saw for them were as the tops of cold frames and that became reality.

I went to the hardware store with my diagram and measurements to get all the supplies.  I was hoping for non-treated wood but was not able to get that – so treated wood it was.

Cold Frames

Cold frame closed

Items Needed

2 glass shower doors (or recycled windows)2 – 2x4x8 pieces of wood
3 – 2 x4x12 pieces of wood
1 box 3″ exterior screws
4 hinges (not nickel plated)
Saw
Drill
Drill bits
Carboard

1. Measure your shower door.

Cold frame shower door

2. Cut the front pieces for your cold frame using the 2x4x8 pieces of wood.

3. Cut the back and side pieces for your cold frame using the 2x4x12 pieces of wood.

Cold frame ends

4. Measure and mark your angle for the side pieces. Cut using your marking as a guide.

Cold frame measuring sidesCold frame side

5. Screw your front, back and sides together.

Cold frame srewing together

6.  Measure where you want your hinges on the door and drill your holes.

7. Attach your hinges to the doors and the cold frame.

Cold frame hinges

8. Move your cold frames to the garden.  We placed the cold frames in front of the metal fence post – this is to hold the doors open when needed.  I think I will put some chains on the doors to make propping them open a little easier.

Cold frame in the garden

9. Line the inside of the cold frames with cardboard to kill the grass, etc. so they are all ready when you want to plant inside come spring (I might try a fall planting of spinach and kale – if there is time).  Your cold frames are done!!!

Cold frame cardboard

I was so excited to see these come together and can’t not wait to use them!!

Digiprove sealCopyright secured by Digiprove © 2013
Posted in Garden, Homesteading | Tagged , , | 1 Comment

Maple Baked Pears

We were recently invited to a community potluck.  The potluck had been rescheduled due to weather and we were really looking forward to meeting all our near and not so near neighbors.  I was not sure what to make and bring and since I had been doing so much baking with pears – I decided why not another pear dish!  I have so many cookbooks, I decided to look up pears in several of them and finally settled on a recipe I found in my The Whole Foods Market Cookbook.

This recipe is super fast to put together and your mouth will be watering before you take it our of the oven – that is how good the smell is!

Maple Baked Pears with Rolled Oat Crust

Baked pears served

Ingredients

4 – 6 medium sized pears (you can substitute apples)
1 tsp lemon juice
1/2 cup maple syrup
1 stick + 2 Tbl butter, melted

1 cups rolled oats (not quick)
1/2 cup flour
1 cup packed brown sugar
1 tsp cinnamon

1. Preheat the oven to 375 degrees.

2. Cut the unpeeled pears in half, remove the seeds and stems.  Cut the pears into 1/2″ thick slices and place in a large bowl.

3. Add the lemon juice to the pears and toss.

Baked pears cut

4. Melt the butter.

5. Layer the pear slices into a 9×12 baking dish.

6. Measure the 1/2 cup maple syrup into a 1 cup glass measuring cup and add 2 Tbl of the melted butter – mix – it will become very thick.  Pour over the layered pears.

Baked pears layered

7. In a medium sized glass mixing bowl combine the oats, flour, brown sugar, cinnamon and the rest of the butter – mix with a fork until crumbly.

Baked pears topping

8. Sprinkle the oat mixture over the layered pears and bake uncovered for 45 minutes.

Baked pears ready for the oven

This is wonderful served warm, but no complaints served cold either!

Baked pears out of oven

When this came out of the oven we waited a few minutes and then left to go to the potluck.  We drove there and no other cars were there, we went to the door and knocked – no answer!  It started at 2pm and it was now 2:30 – where was everyone?!  The smell in the car was torture – our mouths were watering in anticipation of tasting this baked goodness!  We waited a few more minutes and decided we would go into town and run our errands – with the dessert!  When we got to the grocery we saw our neighbors truck we searched for them to ask had the potluck been cancelled or postponed again – but we could never find them.  Back into the car and the smell – OMG!!! One more errand to go, we couldn’t take the torture and when we got home, before we even ate a late lunch – we had our dessert – DELICIOUS!  We never did find out what happened to the scheduled potluck.

Digiprove sealCopyright secured by Digiprove © 2013
Posted in Dessert, Recipes | Tagged , , | 3 Comments

Crispy Pepitas

Ever since I started eating crispy nuts – I can’t go back.  Regular nuts just don’t have the flavor that crispy nuts have – oh, so yummy!  Several years ago when living in Colorado, the health food store there had tamari pepitas and I have craved them and tried to duplicate ever since – with no luck until now!

Are you asking what are crispy nuts?  They are raw nuts that have been soaked and then dried.  This is how traditional people prepared their nuts.  Nuts and seeds contain phytic acid and enzyme inhibitors.  These enzymes are useful to seeds and nuts because it prevents them from sprouting prematurely. But they are very hard on our digestive system.  By soaking your nuts and seeds in a brine it helps encourage the production of beneficial enzymes and these enzymes increase vitamins, especially B vitamins and make the nutrients easier to absorb. I started soaking my grains, flours, nuts and seeds after reading Sally Fallon Morell’s book Nourishing Traditions.  I cannot recommend this book highly enough – check one out at the library and then go buy yourself a copy – it will become your go to reference book and cookbook!

Tamari, Crispy Pepitas

Tamari nuts done

Ingredients

2 cups of raw, hulled pumpkin seeds
1 tablespoons sea salt
1/2 – 1 teaspoon tamari
filtered water

Tamari nuts ingredients

1. Dissolve the salt in the water, start with 2 cups of water.

2. Add the tamari (or other seasoning or no seasoning) to the salt solution and mix.

Tamari nuts brine

3.  Add the pepitas, making sure they are covered with water by at least 1″.

Tamari nuts soaking

4. Leave the nuts on the counter for at least 7 hours or overnight.

5. Drain the nuts and either place on a baking sheet and dry in the oven 12 – 24 hours at a temperature no warmer than 150 degrees or you can use a dehydrator.

Tamari nuts drying

6. Toss at least once while drying.  You want to make sure that the nuts are completely dried or when you store them they could mold.

7. Once completely dried, allow to cool and store in an airtight container.

These go really fast in our house.

For another version, try the following recipe and follow the directions from above.

Spicy, Crispy Pepitas

Ingredients

2 cups of raw, hulled pumpkin seeds
1 tablespoons sea salt
1/2 teaspoon cayenne pepper
filtered water

Digiprove sealCopyright secured by Digiprove © 2013
Posted in Dehydrating, Preserving, Raw Food, Recipes, Snacks | Tagged , , | 2 Comments

Eyelet Scarf

I had some leftover yarn – actually 2 partial skeins leftover from making slippers and wanted to make something fun with it – the colors are great.  I figured what I had leftover was not quite enough for a project so I found the same yarn and bought one more skein.  The original pattern for this scarf used a more “delicate” yarn, but I liked the pattern and had the a particular yarn I wanted to use – so the knitting began!

Eyelet Scarf

Eyelet scarf done

Items Needed

1 – 2 skeins of yarn
Size 5 single pointed needles
Darning needle
Row counter

Scarves are usually about 60″ long – this scarf with about 57″ and 4 1/2″ wide.

Cast on 26 stitches.

Work 6 rows in garter stitch (knit all rows)

Pattern: (this is where I use my counter)

Row 1: K4, *YO (yarn over), K2tog (knit 2 together)*, repeat * thru * until last 4 stitches, K4
Rows 2 – 8: K26

Eyelet scarf start

Continue the pattern until you are almost out of yarn (leave enough for 7 rows and binding off) or you are at 59″.

End with a Row 1 of the pattern.

Knit 6 rows and bind off.

Weave in all ends.

This time of year I am busy making gifts for the upcoming holiday season and even though I have many scarves and neck warmers – I think this one is a keeper for me!  I am sure Stella will be sneaking it to keep her neck warm!

Digiprove sealCopyright secured by Digiprove © 2013
Posted in Crafts, Knitting | Tagged , , | 2 Comments

Pear And Apple Fruit Leather

We were all out of our Papple Jam, which meant it was time to make more!  Two summers ago I made more jam than I knew what to do with and was giving it away and we still have a couple of jars left.  This year I decided I was only going to make Papple, Apple Butter and to try my hand at Grape Jelly.

I made a batch of papple, but it did not set – ugh!  I am not sure why – it is the recipe I always use.  Now I have 7 jars of papple and I was not sure what to do with it – then I thought why  not try and make some fruit leather with it.  I started with one jar.

Pear & Apple Fruit Leather

Fruit roll up wrapped

Ingredients

Pear & Apple jam (aka: Papple)

Here’s another recipe and directions on how to make fruit leather.

1. Place the jerky trays on the regular dehydrator trays – remember to grease them – I used butter.

Fruit roll up greaed

2. Spread a thin, even layer of the fruit mixture – using a spatula to spread around.

Fruit roll up spread

3. Dehydrate from 8 – 12 hours on 135 degrees.  You can also do this in the oven, using baking sheets lined with parchment or plastic wrap.  After about 10 hours, peel the off the jerky tray and place directly on the dehydrator tray – dehydrate for another couple of hours.

4. The leather may be a little sticky, but will be pliable.  Using a sharp knife or scissors (my choice) cut the leather into pieces.

Fruit roll up driedFruit roll up cuttingFruit roll up pieces

5. Take a piece of plastic wrap and place on the plastic wrap. Take one edge of the plastic wrap on turn over onto the pointy end of the fruit leather, but not the over the whole piece, roll up. Store in an airtight container or in the refrigerator.

Fruit roll up wrapping

These were a huge it with the kids – they loved them!  Another batch is being made.  Since I used jam this had more sugar than a traditional fruit leather recipe. They are sweet and are better used as a treat or dessert – not an everyday snack.  These are very similar to the store bought fruit roll ups – but without all the preservatives and ingredients you can’t read.

Digiprove sealCopyright secured by Digiprove © 2013
Posted in Dehydrating, Preserving | Tagged , , | 2 Comments

Make Your Own Shaving Cream

So I have ventured into the making of yet another body product – shaving cream!  I have to admit that usually when I shave I use soap, but when I do use shaving cream I love the feel of my skin and the shave is closer.  Winter is coming so I do not worry as much about shaving, but it is the time that I need more moisture for my skin.

Before going into this venture I wanted to find out more about the ingredients in shaving cream.  The more expensive the shaving cream the better the ingredients, but still not completely good for you and/or the environment.  Not all these ingredients are in all shaving cream, but most shaving cream has at least one.

  • Triethalolamine – when combined with other chemicals has been linked to cancer and non-reproductive organ toxicity.
  • Isobutane – has been linked to cancer in lab tests.
  • Phthalates – this is what makes shaving cream smooth, they are endocrine disruptors and research has linked it to neurotoxicity, neurodevelopmental disorders, asthma and allergies.
  • Methylparaben – has been linked to tumor growth and they are considered endocrine disruptors.
  • Triclosan – is an antibacterial agent, hormone disruptor and is bad for septic systems and natural water systems.
  • Sodium lauryl sulfate – this is considered bad for you and the environment, causing irritation of the skin and eyes, organ toxicity, development/reproductive toxicity, neurotoxicity, endocrine disruption, cellular changes, is deadly to fish and can cause birth defects in animals.

I had all of these ingredients on hand because I make our sunscreen and several types of sugar/salt scrubs.  Most you can get at your local health food store, but you might have some difficulty getting the shea butter.

Shaving Cream

Shaving cream shave

Ingredients

4 Tbl shea butter
3 Tbl coconut oil
1 Tbl jojoba oil
1 Tbl vitamin e oil
5 – 6 drops lavender oil
5 – 6 drops patchouli oil

Shaving cream ingredients

1. Place the shea butter and coconut oil into either a double boiler or a glass bowl that will fit into a sauce pan. Melt the butter and oil on the lowest setting, mix several times during the melting process.

Shaving cream double

2. Once the butter and oil is melted, move the bowl to the counter and add the jojoba and essential oils – mix.  Many of the recipes I found used 2 Tbl jojoba oil, but I did not have enough, so I added Vitamin E oil, but you could also you almond oil.

Shaving cream melted

3. Place the bowl in the refrigerator and allow to harden.

Shaving cream hard

4. Once hardened, take out of the refrigerator and allow to sit for a few minutes.  With you hand held mixer, whip the mixture until is looks like frosting.

Shaving cream whipped

5. Transfer to an airtight container.  I used a washed plastic, honey jar.  You can use a mason jar, but I thought plastic was probably a better bet in the shower!

This shaving cream does not foam like tradition shaving cream.  When you put it on it is a little foamy, but the heat of your skin and the room will cause it to be more like a shaving oil.  It works really well and leaves your skin feeling nourished and silky!

Digiprove sealCopyright secured by Digiprove © 2013
Posted in Beauty | Tagged , | 4 Comments