Gratitude

This is my 500th post!  I am thankful to those of you who follow me, share my recipes, crafts,life stories with others.  I am grateful for what I, for being able to have dreams and aspirations and to see some of those come to fruition and know that the others will follow.  As we enter into the season of thanks and giving – I am thankful for so much and I hope that I give as much as I receive.

As you prepare for all the hecticness of the upcoming holiday season, remember to take time to appreciate you, value the people in your life and breath.  With that I leave you with one of my favorite poems.

Desiderata

Go placidly amid the noise and haste,
and remember what peace there may be in silence.
As far as possible without surrender
be on good terms with all persons.
Speak your truth quietly and clearly;
and listen to others,
even the dull and the ignorant;
they too have their story.

Avoid loud and aggressive persons,
they are vexations to the spirit.
If you compare yourself with others,
you may become vain and bitter;
for always there will be greater and lesser persons than yourself.
Enjoy your achievements as well as your plans.

Keep interested in your own career, however humble;
it is a real possession in the changing fortunes of time.
Exercise caution in your business affairs;
for the world is full of trickery.
But let this not blind you to what virtue there is;
many persons strive for high ideals;
and everywhere life is full of heroism.

Be yourself.
Especially, do not feign affection.
Neither be cynical about love;
for in the face of all aridity and disenchantment
it is as perennial as the grass.

Take kindly the counsel of the years,
gracefully surrendering the things of youth.
Nurture strength of spirit to shield you in sudden misfortune.
But do not distress yourself with dark imaginings.
Many fears are born of fatigue and loneliness.
Beyond a wholesome discipline,
be gentle with yourself.

You are a child of the universe,
no less than the trees and the stars;
you have a right to be here.
And whether or not it is clear to you,
no doubt the universe is unfolding as it should.

Therefore be at peace with God,
whatever you conceive Him to be,
and whatever your labors and aspirations,
in the noisy confusion of life keep peace with your soul.

With all its sham, drudgery, and broken dreams,
it is still a beautiful world.
Be cheerful.
Strive to be happy.

Max Ehrmann, Desiderata, Copyright 1952.

Digiprove sealCopyright secured by Digiprove © 2013
Posted in Life | Tagged , , | 2 Comments

Easy Pumpkin Soup

With it being fall and Thanksgiving coming up – pumpkin is on the mind and on many a menu.  I have a case of sugar pumpkins and had been itching to make a pumpkin soup.  I decided I would just wing this recipe and I wasn’t sure how it would come out, but it hit all the yum taste buds!  This could also use butternut or acorn squash if that is what you have on hand.

The flavor, with hints of cinnamon and nutmeg and the added cream make this a comfort food on my list.  Add some crispy pepitas and you are set!

Pumpkin Soup

Pumpking soup served

Ingredients

2 medium sized sugar pumpkins roasted
6 – 8 cups vegetable or chicken broth
7 Tbl flour
2 – 3 Tbl butter
2 – 3 tsp nutmeg
1/2 Tbl cinnamon2 Tbl maple syrup
Sea salt for seasoning
Heave cream (optional)
Crispy pepitas (optional)

1. Roast your pumpkins.  When they are roasted, scoop the “meat” into a bowl, set aside.

Pumpkin soup pumpkin cooked

2. In a saucepan, heat your broth.

3. In a large soup pot, add your flour and toast. Stir the flour continually – you do not want it to burn.  When you can start to smell the flour it is done.

PUmpkin soup flour

4. Add the butter to the flour and make a paste.

Pumpkin soup butter

5. Add about 4 cups of the broth to the flour paste and stir well – you don’t want any clumps.

Pumpkin soup broth

6. Add the pumpkin “meat” to the broth and stir – add more broth. Let simmer for 5 – 10 minutes.

Pumpkin soup pumpkin added

7. Using an immersion blender, puree to pumpkin.  If too thick add more broth.

8. Add the nutmeg, cinnamon, syrup and salt – stir.  Taste and if needed add more spices, salt and/or syrup.

Pumpkin soup spices

Serve with a drizzling of heavy cream and sprinkle with pepitas.  This is a thick soup and really fills you up – goes well with the everything soda bread!

Digiprove sealCopyright secured by Digiprove © 2013
Posted in Recipes, Soup | Tagged , , | 2 Comments

Everything Soda Bread

When I came across this recipe – I just knew I had to try it!  I also sent the recipe to many family members.  One of my aunts made the bread before I did and gave me some to try –  delicious!  Stella and I both thought it was an everything bagel in a bread version.  We served this at our game night and it was a BIG hit and the recipe was shared with even more.

This bread is so easy – no raising time, delicious plain, with a soup, toasted with eggs – yummy!

This recipe was found off the Mountain Rose website under the name Seedy Salted Soda Bread, but we like the Everything Soda Bread name.

Everything Soda Bread

E bread served

Ingredients

2 cups organic unbleached all-purpose flour
1 ¾ cup organic whole wheat flour
2 tsp baking soda
1/2 tsp fine sea salt
1 3/4 cup organic buttermilk (preferably made from raw milk)
2 Tbl poppy seeds
3 Tbl hemp seeds
3 Tbl sesame seeds
1 tsp caraway seeds
1 tsp fennel seeds
1/2 tsp course sea salt
extra buttermilk

1. In a bowl combine all the seeds, set aside.

E bread seeds

2 Preheat the oven to 350 degrees.

3, In a bowl combine the flours, baking soda and fine sea salt. Sift these ingredients into another bowl.

E bread siftingE bread flour

4. Reserve 2 tsp of the seed mixture and add the rest of the seeds to the flour mixture and combine.

E bread flour with seeds

5. Make a well in the flour mixture and pour the buttermilk into the well. Mix with a wooden spoon until combined, but do not over mix.

E bread buttermilk

6. Turn the dough onto on a lightly floured board and knead for about 1 minute.

7. Lightly dust a baking sheet with cornmeal.

8. Place the dough onto the baking sheet and using a sharp knife cut a cross into the bread the cut should be about half way through the dough.

E bread dough

9. Brush the dough with buttermilk and then sprinkle the remaining seeds and course sea salt onto the top of the bread.

E Bread cut

10. Bake for 30 – 35 minutes on the center rack of your oven.

11. Cool on a wire rack.

E Bread out of oven

The crust is hard and crunchy with a soft inside – the taste – wonderful – bursting with all the flavors from the seeds. I would like to try this recipe with soaked/sprouted seeds – hoping I can remember the next time I make it – which will be soon! Thank you Mountain Rose for sharing this wonderful recipe!

Digiprove sealCopyright secured by Digiprove © 2013
Posted in Bread, Recipes | Tagged , , , | 2 Comments

Knitted Princess Purse

Like all the years past – I am behind on my Christmas gift making.  I have been frantically putting my list of gifts together, checking and double checking against past years list – making sure I am not making the same gift for the same person – again! (which I have done!)

Many of the gifts I am making I have already blogged -but it does make the making stage a little less crazy since I am not trying to make and learn something new.

We have several little girls on the gift list and what little girl does not like sparkles?  I don’t know too many – so I decided to make a sparkly princess purse.  I used to make these as birthday gifts for Stella’s friends, but I have probably not made one is 5 years.

Sparkly Princess Purse

Princess purse done

Items Needed

1 skein fun fur with sparkles
1 skein yarn* (I used a metallic yarn, but the metallic does come off in places as you knit)
Circular or straight needles – size ccording to yarn requirements, but no larger than size 8
Darning needle

A couple of things to note on this pattern.  You can knit the purse with circular needles or make it in two pieces and sew together.  Also I would not recommend using yarn that using needles larger than size 8.

1. With both yarns held together cast on 60 stitches or how many stitches needed to get the circumference between 6 – 7 inches.

Princess purse cast on

1a. If you are choosing to to knit two pieces, cast on 30 stitches with both yarns.

2. Start knitting in the round, making sure not to twist the stitches.

3. On circular needles, knit each row until your piece measures 1 inch. Cut the sparkly fun fur and continue knitting each round until your piece measure 6 inches.

Princess purse fun furPrincess purse body

3a. On straight needles knit in stockinette stitch until your piece measures 1 inch. Cut the sparkly fun fur and continue knitting until your piece measure 6 inches.

4. Bind off all stitches,

5. Turn your piece inside out and sew the bottom seems together.

Princess purse bottom sewed

5a. Once you have 2 pieces, face right side to right side and sew side and bottom seam together.

The Strap

1. Using straight needles, with both yarns cast on 40 – 50 stitches (the more stitches the longer the strap).

Row 1: Knit

Row 2: Purl

Row 3: Knit

Row 4: Purl

Row 5: Knit

Bind off.

Princess purse handle

Sew the handle onto your purse.  Weave in all ends.

Princess purse parts

Fill the purse with sparkly stickers, pencils, crayons and your gift is done!

Digiprove sealCopyright secured by Digiprove © 2013
Posted in Crafts, Knitting | Tagged , , | 2 Comments

Primal Fudge – You Will Love This!

My aunt shared this recipe with us and yummy!!!  She used almond butter, but we tried peanut butter – both are delicious!!  The almond butter makes it taste similar to an almond joy and using peanut butter makes it taste like a reece’s peanut butter cup.

There is no refined sugar in these and really good fat.  I have a sweet tooth and break down ever so often and get a dark chocolate coconut bar at the health food store, but I don’t think I have to do that anymore.  These are so easy to make, so good and not bad for you – what more could you ask for?!

Primal Fudge

Fudge done

Ingredients (can be easily doubled)

Fudge ingredients


1/2 cup coconut oil (melted or not)
1/2 cup almond butter or peanut butter
1/8 cup cocoa
1/8 cup cacoa (or you can do 1/4 cup cocoa)
1/4 cup raw honey
1/2 tsp sea salt


1. Melt the coconut oil.

Fudge coconut oil

2. In a food processor or blender, combine all the ingredients.

Fudge all inFudge mixed

3. Pour or spoon the “batter” into small muffin papers.

Fudnge in cups

4. Place in the refrigerator for 1 hour to harden or the freezer for 30 minutes.

5. Store in a closed container in the refrigerator – but these will go fast!

As part of Stella’s birthday celebration – she requested my apple squares, but I also made these and they were a definite hit with both kids and adults!

Digiprove sealCopyright secured by Digiprove © 2013
Posted in Dessert, Recipes | Tagged , , , | 2 Comments

Lasagna, Make Ahead For Later

This past weekend was one of many birthday celebrations.  My daughter, Stella, turns 10 this month and I can’t believe it!  Where has the time gone?  I hugged her the other day and she came up to my chin – I remember when I could hold her with just one arm – Wow!  We had a family party, her first, and there were 16 people at her birthday dinner.  She requested lasagna and of course I said yes, but then I started thinking – I had not made a lasagna in 26 years!  I needed to make them ahead and freeze them and just keep my fingers crossed that it would be good.

Lasagna (I made 2 – one meat and one veggie, since Stella does not eat meat)

Meat Lasagna

Meat Lasagna

Spinach Lasagna

Spinach Lasagna

Ingredients

2 packages lasagna noodles
1 pound ground beef
1/2 pound ground pork
Fresh spinach
2 quarts diced tomatoes
47 ounces whole milk ricotta (1 1/2 containers)
6 cups grated cheese (mozzarella, cheddar, parmesan)
6 eggs
Oregano
Sea Salt
Pepper
Cayenne pepper
Lard, tallow, coconut oil for cooking

1. Prepare noodles according to package.

2. Brown meat in a skillet.

Lasagna meat

3. Saute spinach.

Lasagna spinach

4. Pour diced tomatoes into a large pot and using a stick blender, puree.  Or you can use canned sauce.

Lasagna dice tomato

5.Grate your mixture of cheese.

Lasagna cheese grated

6. Mix together the ricotta, eggs, 4 cups grated cheese, oregano, salt and pepper.

Lasagna cheeseLasagna cheese mixed7. With one of your 9×13 baking dishes, spread some of the tomato sauce on the bottom of the pan.  Next layer cover the sauce with noodles, then cover with the ricotta cheese mixture, then spinach, repeat one more time.  The last layer: noodles, sauce, grated cheese.

Lasagna spinach layerLasagna spinach made

8. Add the browned meat to the remaining tomato sauce.

Lasagna meat sauce

9. In the other 9×13 baking dish, spread some of the meat sauce.  Now start the layering: noodles, ricotta cheese mixture, meat sauce – repeat one more time.  The last layer: noodles, meat sauce and grated cheese.

Lasagna meat sauce first layerLasagna noodle layerLasagna cheese layerLasagana meat sauce layerLasagna meat made

10. Cover both pans with saran wrap and then tin foil – place in freezer.

Lasagna saran wrapLasagna tin foil

11.  In the morning of the day you are going to cook the lasagna, take out of the freezer and allow to defrost.

12. Preheat the oven to 350.

13.  Take the saran off the pans and then recover with the tin foil.  Bake for 1 hour, take the tin foil off and bake another 15 minutes.

Cut and serve.  Everyone told me it was good – so I am going to believe them.  Stella loved it and had a great family party!

Digiprove sealCopyright secured by Digiprove © 2013
Posted in Dinner, Recipes | Tagged , , , | 2 Comments

A Meal In Itself – Vegetable Bread

Here is another meal that my cousin and I made during our cooking extravaganza weekend!  I used to make this all the time, but for some reason it fell off the roster of breads and winter meal recipes.  This goes great with a soup or salad or just by itself.  You can add whatever vegetables you have on hand and if you want you can also add some sausage, ground beef or chicken.

Vegetable Bread

Veg bread sliced close

Ingredients (makes 2 loaves)

1 Tbl yeast
2 cups warm water
2 Tbl sugar
1 Tbl sea salt
5 – 8 cups flour – we used a combo of spelt and some wheat
2 – 4 cups chopped vegetables (sauteed and drained)
3/4 pound of grated cheese (cheddar, parmesan, mozzarella)
Garlic minced

1. Dissolve the yeast in warm water, stir until you have a light brown water mixture.

Veg bread yeast

2. Add the sugar, salt and 2 cups of flour – mix for 2 minutes.

3. Continue to add flour and stir until you can begin to work the dough with your hands.

4. Knead the dough for 3 – 8 minutes, you can do this in the same bowl you mixed in.

Veg bread kneaded

5. Cover the dough in the bowl, place in a warm location and let rise, about 1 hour.

6. Cut you veggies and saute. When done cooking drain any liquid from the pan and set aside.

Don't you just LOVE the design on this squash!?

Don’t you just LOVE the design on this squash!?

Veg bread veggies

7. If using sausage or ground beef or chicken or a combo – cook that, drain and set aside.

8. Grate your cheese and set aside.

9.When the dough has risen for about an hour or is double in size, punch down dough and divide in half.

Veg bread dough risen

10. Lightly flour your work area and using a rolling pin roll the dough out into a rectangle.

Veg bread rolled

11. Place the filling (veggies, meat, cheese) in the dough, leaving a 1/2″ space all the way around.

Veg bread veggies onVeg bread meat onVeg bread cheese on

12. Roll up the dough and make sure to tuck the ends in and pinch closed.  For the top of the roll – I press the dough together using my fingers or a fork.

Veg bread rolled upVeg bread rolled and tucked

13. Grease a baking sheet and sprinkle some corn meal on top.

14. Transfer the rolled up bread from your work space onto the baking dish – slash the top of the bread with a razor or knife, place in a warm area and allow to rise again, 30 – 60 minutes.

Veg bread slashed

15. You can brush the top of the bread with an egg wash (egg slightly beaten with some water) and then sprinkle seeds on top.  We did not do this.

16. Preheat the oven to 375.

17. Bake for 35 – 45 minutes, take out and place on rack to cool slightly before cutting.

Veg bread out of ovenVeg bread sliced

This is another one that you can freeze for a future meal – delicious!!!  My mouth is watering just writing all this – knowing how good this bread is!!

Digiprove sealCopyright secured by Digiprove © 2013
Posted in Bread, Dinner, Recipes | Tagged , , | 2 Comments

Prepare Ahead Egg Lasagna

I love to cook and bake, but doing it with someone else makes it even better!  I spent a weekend cooking with my cousin.  Both of us take great pride and effort in preparing wholesome, nourishing foods for our families, but at times we are both pressed for time when it comes to making dinner.  We decided to get together for a weekend of cooking foods that we could freeze and have on hand when we needed a quick, but nourishing dinner.  Along with our cooking we also prepared lunch, dinner and breakfast for 8 – I would say that we were definitely super moms!!

This dish was one that my cousin loved growing up – I had never had it, but had looked at the recipe several times in a family cookbook – so glad that we made it!  It is now a new family favorite in our house.  One of the best things about this recipe is that it freezes wonderfully!

Egg Lasagna

Egg lasagna served

White Sauce Ingredients

4 Tbl butter
4 tbl flour
1/2 tsp salt
2 cup whole milk, preferably raw

Lasagna Ingredients

1 box lasagna noodles, cooked
1/2 lb swiss, cheddar, parmesan or mozzarella cheese or a combination of all three
6 hard boiled cooked eggs
2 cups white sauce
Sauteed chard (optional)

To Make the White Sauce (makes 2 cup)

1. Melt butter.

2. Once the butter is melted add the flour and salt and then add the milk all at once.  If you have any farmer’s cheese on hand you can add some of that too.

3. Keep stirring over medium heat until thickened.

To Make the Egg Lasagna

1. Hard boil the eggs, set aside to cool.

2. Cook the lasagna noodles in water with salt and some olive oil. The olive oil helps with preventing the noodles from sticking together when they are cooling.

3. Peel and slice the hard boiled eggs, set aside.

4. Preheat the oven to 350 degrees.

5. Using a 9×13 baking dish coat the bottom of the pan with some white sauce.

Egg lasagna white on bottom

6. Now to layer: noodles, chard, sliced eggs, sauce, cheese.  We used a combination of cheeses along with some farmer’s cheese that my cousin had made ahead.

Egg lasagna noodles

Egg lasagna chard layerEgg lasagna eggsEgg lasagna sauceEgg lasagna cheese

7. For the last layer: noodles, cheese and then pour remaining sauce over the top.

8. Bake the lasagna for 1 hour.

Egg lasagna out of oven

9. Allow to cool for at least 15 minutes before cutting.  You can cut pieces, wrap in parchment paper and then foil and place in the freezer – remember to label with name and date.

When heating up, place in an oven or toaster oven at 350 degrees for about 25 minutes.  This is great with a side of salad or veggies.  This is one of Stella’s new favorites and it is great for those nights when she had an after school activity!

Digiprove sealCopyright secured by Digiprove © 2013
Posted in Dinner, Recipes | Tagged , , | 2 Comments

Keep The Draft Out – Roman Curtains

The first part of winter is here, with cold nights and chillier days.  We have already had several hard frosts and a dusting of snow.  I held off as long as I could before building the first fire in the wood burning stove and I have yet to turn the heat on.  The heat in the house is electric, which is expensive.  The wood burning stove is in the basement with only one vent to the upstairs and that was blocked when they insulated the basement ceiling – not too smart.  So with the wood stove I am heating two floors about 2200 square feet.  We have placed extra blankets on the beds and are closing the blinds on the windows that have them.

With moving to rural America and homesteading as much as possible – I pay cash for everything and do not want to accumulate debt unless I absolutely have too – a mortgage is enough.  Buying a home that is over 30 years old and someones second home, there are things that need to be done and I was aware that the windows were single pane and now I can see which ones need replacing sooner than later and can also feel the draft coming in.  First on the list of improvements is adding vents from the basement to the first floor.  Windows were further down on the list, but they may be moving up that list – we will see.  The living room windows are the worst of the lot, with one of them not having any screen or storm and it it facing the windy side of the house.   The front door you can see through the cracks around the door and the front window – it is big, but at least it faces south.

I went in search of quilted blankest or moving blankets at the local thrift store – but did not find any – so headed over to the fabric store.  Wanted to get quilted fabric, after seeing that it was $9.99 a yard – I decided I would go with fleece and then for the front window because it is so big and the fleece was not wide enough went with a heavy felt.

Roman window
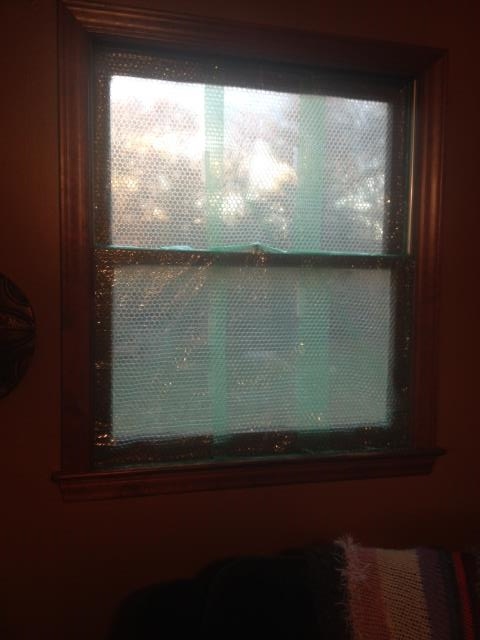
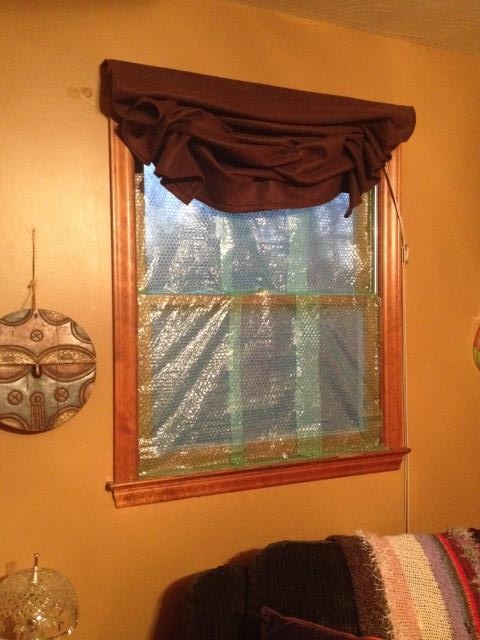
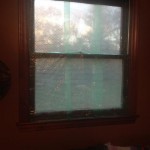
To take blocking the draft one step further – I decided I would line the one window with bubble wrap since I saved all of it from the move – the problem – the clear bubble wrap were all small pieces so I ended up using the green – it add a nice hue to the room.  The front door was sealed with weather stripping and we could already feel the difference.

Next was making the curtains.  I decided on making them as simply as possible and I wanted them to roll up like roman shades.  After getting all the materials, I was ready to taking the sewing machine out and get started!

Roman Curtains (or Roman Shades)
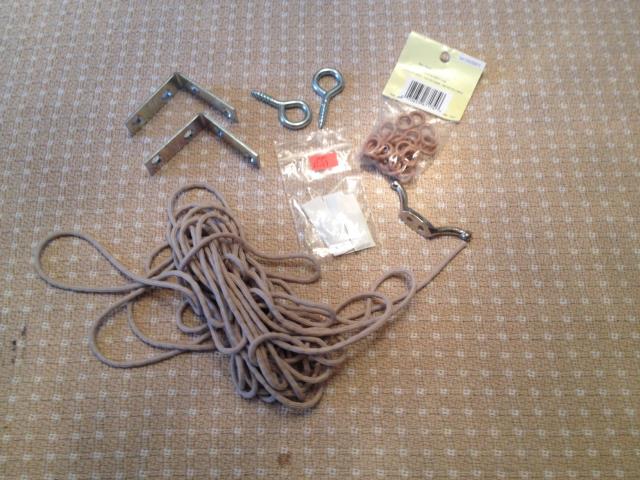
Roman up

Items Needed

A heavy material
Line material, if using (I did not)
Thread, color to match material
Rings (brass if you can find them – I could only find plastic ones)
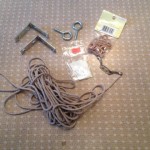
Roman materials
Nylon cord
Eyelet screws (quantity dependent on size of curtain)
1/2″ screws (quantity dependent on size of curtains and how many “L” brackets)
“L” brackets (I used 3 for the smaller window )
Weights (found in the curtain section of my local fabric store)
1/2″ thickness wood in the length of your window (measure from outside the frame)
1 Rope cleat
Screws to mount the curtain and the rope cleat
Screwdriver
Drill
Staple gun or small nail tacks
Needle

1. Measure your window.  I wanted my curtains to cover the whole window.  I measured from outside frame to outside frame to get both my width and length.

2. Get all your materials.  I went to 2 fabric stores and two of our local hardware stores to get all my supplies.

3. Using your window measurements add a 1/2″ to the width (this is for your 1/4″seams) and make sure that you add enough to the length for your fabric to wrap partially around your wood piece and to hem the bottom,which will include the weights.

4. Sew your side seams.

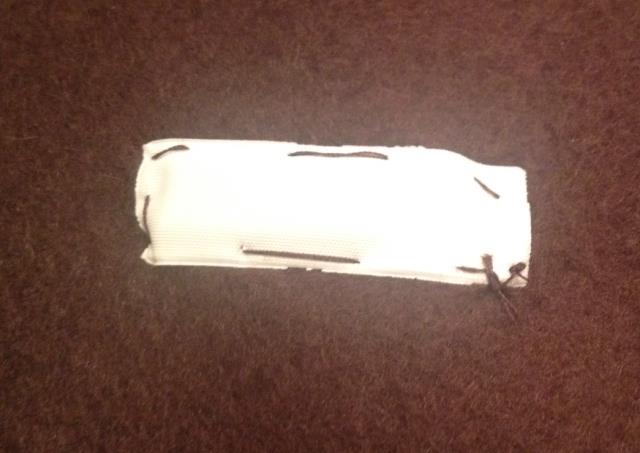
5. Sew your weights into the bottom of the curtain, allowing enough material to fold over and sew a hem.

Roman weightsRoman weight sewn

6. Sew your top 1/4″ hem.

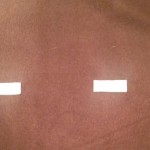
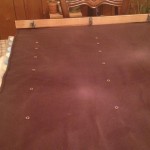
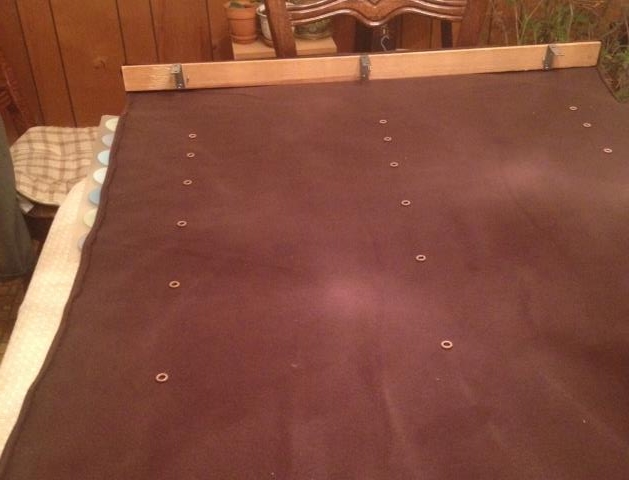
7. Laying your fabric out with wrong side facing up, it is now time to sew your rings on. The width of my smaller curtain was 37″ and from my research I figured it needed 3 rows of rings.  I measure to get the center, 18.5″ and marked the fabric – I then measured the window frame width and added 2 inches onto that to get my other 2 marks for the rings – this was 5″ from the outside width edge.

8. Now to mark where the rings would be sewn on. The first ring started at 5″ from the bottom of the curtain, the next ring was 8″ up from that, then 7″ and so forth with the last ring having a 3″ distance.  Now sew your rings on, going through the fabric, but only tacking on the top of each ring.

Roman rings

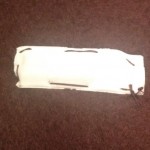
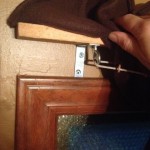
9. Lay your piece of wood on your fabric, so that the edge of the wood lines up with the edge of your fabric.Using either a staple gun or nail tacks attached the curtain to the wood – lining edges up.

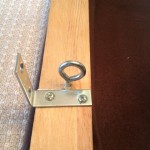
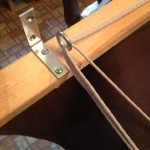
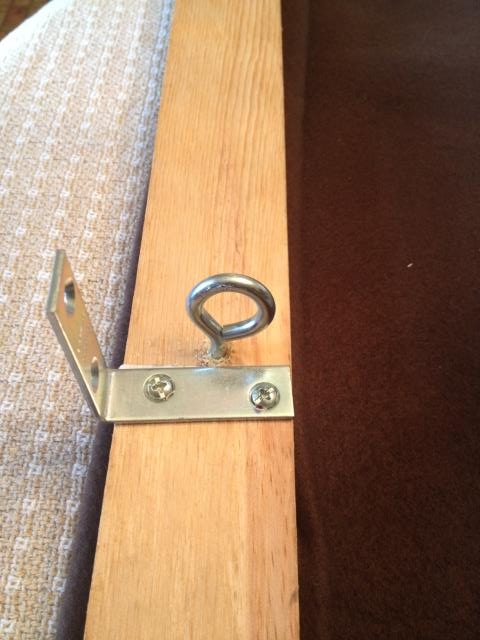
10. Mark your pieces of wood to attach the “L” brackets and the eye screws.  I lined the eye screws with the rings, attaching the eye screws on the inside side of the “L” brackets. Before mounting  your eye screws makes sure that the eye will hold all the cord that needs to go through it.

Roman l bracket

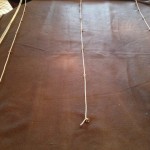
11. Insert the cord. I tied a knot at the bottom rings, burn the raw edge of the knot a little (only if it’s nylon cord, as it melts), then run it up through the rings and across through the eyelet screws.  When running the cord down the curtain, leave enough of a tail for securing on the rope cleat. I also added a little bit of glue onto the knots.

Roman cord thruRoman thru

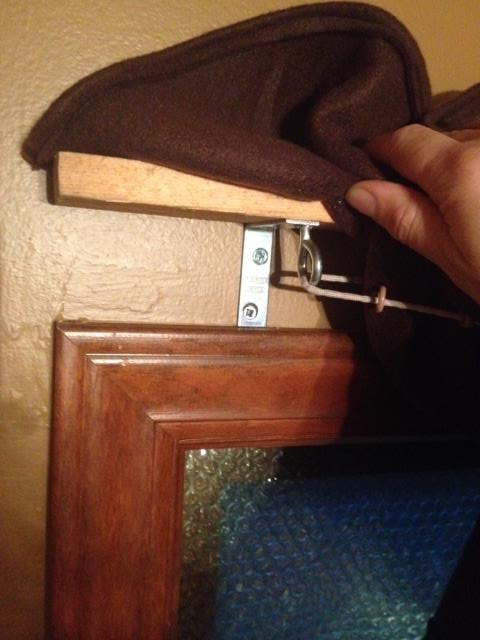
12. You are now ready to mount over the window.  Hold the curtain up and mark where the screws will go.  Screw the curtain to the wall.

Roman mounted

13. Attach the rope cleat to the wall.

Roman down

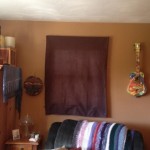
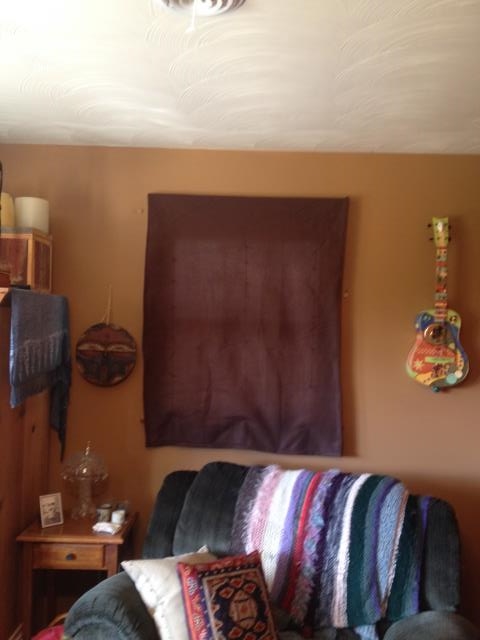
I was so happy that it worked.  it would have pulled up in layers better if I had put a backing on, but I chose not to – mainly because of the thickness of the fleece.

Digiprove sealCopyright secured by Digiprove © 2013
Posted in Crafts, Sewing | Tagged , | 2 Comments

Soups On! Borscht

I have been craving some borscht ever since I steamed and froze a case of beets!  My cousin had given me some beef/pork broth and I thought it would work really well in a pot of Borscht.  I have also been busy making many soups and recipes that will freeze well for a homestead work exchange!  I have another cousin coming to help me with several projects around the yard and for his time the exchange is meals that can be pulled from the freezer for some homemade goodness.  Of course I am making enough for our dinners and stocking the freezer.  I love to have some items in the freezer for those evenings when you know you are going to get home late and not have the same amount of time to make a nourishing meal.  The only trick to the freezer meals is remember the evening or morning before to take it out of the freezer!

I found this recipe in a cookbook one of my grandmother’s friends gave me when I was 20 – what a difference in the recipes.  There are many that use the cream of soups, but these recipes are not concerned about low/no fat and are filling and nourishing!

Borscht

Borscht served

Ingredients

2 carrots
6 medium beets
1 celery stalk – cut thin
1 medium onion, sliced thin
3 Tbl butter
2 quarts (8 cups) broth – water combination*
6 peppercorns
1 bay leaf
2 tsp sea salt
2 cups shredded cabbage
1 tsp apple cider vinegar
Season to taste

* my bone broth is very condensed and strong and is too overpowering if used straight.  The ratio was about 3 cups broth to 5 cups water.

1. Slice carrots and beets into julienne strips and heat with the celery and onion in butter in a large soup pot. I used my steamed and frozen beets – so I added later to the soup.

Borscht veggiesBorscht veggies in pot

2. Add the broth, water, peppercorns and salt – cover and bring to a boil, reduce the heat and simmer for 1 – 1 1/2 hours.  I added my beets after an hour of simmering.

Boscht broth added

Borscht beetsBorscht beets added

3. Add cabbage to the soup and cook 10 – 12 minutes.

Borscht cabbageBorscht cabbage added

4. Add the vinegar to the soup.

5. Season – I added some more pepper and salt.

I grated some cheese and added to my bowl of soup, but you could also do sour cream.  If you have some leftover beef, add that too! I did not add any beef to mine, hoping that Stella would give it a try- so far not, but hoping this week sometime she will! I really enjoyed (or I should say my mouth did) the flavors all mingled together!

Digiprove sealCopyright secured by Digiprove © 2013
Posted in Recipes, Soup | Tagged , , | 4 Comments