Trick or Treat – The Joy of the Sugar High!

Living in the Hudson Valley and in the town next to Sleepy Hollow – Halloween is a BIG deal.  Washington Irving’s home is here and the Headless Horseman statue is across the street from the historic cemetery.  We see an influx of tourist during the month of October – to take part in tours of the cemetery or if you dare the lantern tour,  to hear the Legend of Sleepy Hollow performed at the Old Dutch Church or to take the Haunted Hay Ride – with a warning for those with heart conditions!  Every weekend there is an activity for the kids – build a scarecrow, rag-a-muffin parade, Halloween activities along Beekman, window painting and the most looked forward event – the Halloween Parade and block party.  The kids love the parade, if they are in costume they can march in the parade, but if you stand on the side you get to catch the candy thrown from the participants – then it is off to the block party – with music, dancing and fun all around.  This year the parade was scheduled for Saturday, but mother nature did not cooperate and decided to dump 10″ of snow – it was rescheduled for Sunday, but then cancelled!  Bummer, was an understatement expressed in our house and many others.

Every year I wonder what Stella is going to decide to be – we have done the princess route with only one year of being a lion.  This year she decided she wanted to be Storm from X-Men, but not the one that you see the costume of in all the costume stores – she wanted to be Storm from the comic book.  So, it was determined that she was going to do the white outfit – so it was off to figure out how to put the costume together, we needed a white dress, white hair wig, long gloves, wings and of course the badge.  I pieced the costume together and then was ready to start the making of it, when I was informed that she wanted to be Storm in the blue outfit, oh and by the way Storm does not wear a dress or have wings – it is pants and a cape. This all told to me on Thursday evening!


I had just finished putting up Stella’s summer clothes and taking out the winter ones and remembered that I had come across some ballet leotards and tights – would they work?  Up into the attic and to go through the boxes trying to find the items – found.  Stella, will these work – I think so.  They fit – BUT – they were pink and not blue.  That was ok – I could work with that.  Off to the computer to find a picture so that I would get the costume right – we found one.  The white wig and gloves would work – the leotard and tights would work, now what to use for a cape and then I was informed that Storm wore white boots – so could I go out and buy a pair – NO – I could not do that.

Friday morning it was off to find some blue dye – only had to go to two stores.  Home and the dying process began – done put on the rack to dry.  Stella came home and wanted to see how they came out – now the tights did not match the color of leotard that she wanted to wear – being the smart mom that I am – I had dyed 3 leotards – and YES one of them would work.  I had an old pillow case that I also dyed for the cape.

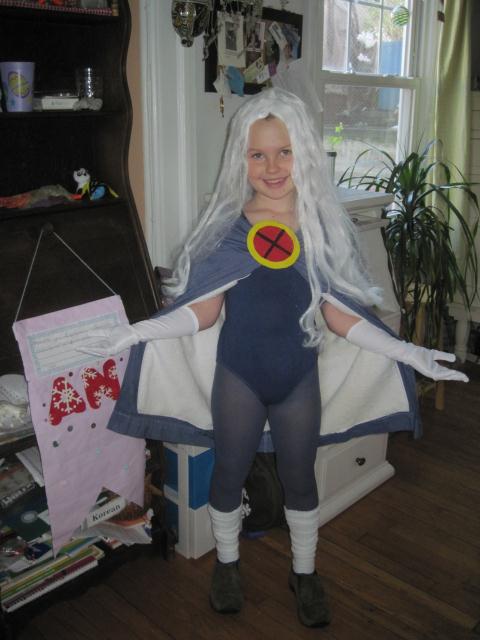
Sunday it was time to get busy – the costume had to be made and now the weather had turned – was there a way to make it a little warmer?  Not really since it was tights and a leotard – but the cape – what could I do there?  I had a couple of old white hand towels and Storm’s cape was blue on the outside and white on the inside – this could work.  For the white boots – a pair of old tights would work – cut the foot off and they would cover Stella’s shoes and the other part she would wear as leg warmers, but would look like the leg part of the boots.  Stella was going to make the badge.


Ok – it was ready to put the costume on – and thanks to Grandma Jo – Stella decided that a home made costume was the best costume ever.


Digiprove sealCopyright secured by Digiprove © 2011
Posted in Life | Tagged , , | 6 Comments

Snow, Wind, Cold – Soup!

I usually do not believe the weather people, but they were right with the forecast of a nor’easter, but the snow accumulation of 3 – 5″ was off – we got about 10″!  The sun was shining, but the wind was blowing and it was cold outside – so what better way to spend the afternoon, but making a good, big  pot of soup.  I was not going to the store – so I had to make due with what was in the house and I wanted lentil soup.

Lentil Soup Recipe

Ingredients

1 Tbl Olive oil
1 1/2 tsp cumin seeds
1/2 tsp ground coriander
1 tsp paprika
Ground pepper
1 small onion chopped (I had about 1/2 of a large onion in the fridge – so that is what was used)
Several garlic cloves – chopped (my belief is that you can never have too much garlic!)
2 carrots  cut into bite size pieces (wanted to use some of what I just harvested – see Wednesday, November 2nd post)
1 1/2 cups lentils – washed and sorted through
7 – 9 cups of vegetable broth
1/2 cup Quinoa
2 cups packed spinach
1 can diced tomatoes and the juice


1. Cut the onion, carrots and garlic. Look how orange the carrots are!

2. In a large, heavy bottom pot, heat olive oil and add cumin seeds.  Stir, so as not to burn the seeds – once the aroma hits you and they start to pop – ready for the next step.

3. Rinse and sort the lentils while the cumin seeds are cooking.


4. Add the onion, carrots, garlic and coriander – cook for about 5 minutes until the onions are translucent.

3. Add the paprika and ground pepper – stir and cook about 1 minute.

5. Add the lentils and 7 cups of vegetable broth, simmer, uncovered, for about 30 – 40 minutes until the lentils are tender.

6. Once the lentils are tender add the spinach, quinoa and tomatoes – let simmer, uncovered, for another 30 minutes. You may find that the soup becomes very thick – if so add another 1-2 cups of vegetable broth.

7. Your house will smell divine!  Serve hot and enjoy – a good glass of red wine compliments the soup – highly recommend it!

This made a whole lot of soup and since Stella is not a soup girl, disappointing, I will have lunch all week.  I also froze some for the times when I need a quick dinner!

Digiprove sealCopyright secured by Digiprove © 2011
Posted in Recipes | Tagged | Leave a comment

Turn a Sweater into a Purse

I finished my first project with one of the sweaters I bought at the church bazaar.  I turned the sweater into a purse.  I have read and seen many patterns for knitting a purse and then felting it, but this is so much faster!

How To Turn A Sweater Into a Purse

1. You will have to find a wool sweater that is in pretty decent condition.  I look for them in thrift stores. yard sales and I also put “ads” on freecycle.com and craigslist.org – asking for wool sweaters or wool blankets.

2. You then need to do the unthinkable to the wool sweater – wash it in hot water and dry it! This step is a little wasteful with water and energy use, but it is faster than doing it by hand in the sink.  In the washing machine, turn the setting to the longest cycle and fill with hot water, a little bit of soap, the sweater and a pair of jeans.  Once it is done washing, you will need to put it in the dryer – there will be A LOT of lint.  I had to do the sweater through 2 washes and 2 dry cycles to get it to the felting condition I wanted – but you also want to make sure you do not make it too small that you can not a make the item that you want.

Before

After

Felted


3. Cut the sleeves off the sweater.  These can be turned into fingerless mittens with just a snip for the thumb hole.  You can add designs, but I have not done so yet and am not sure if I will.


Cut Sleeves Off

Cutting the Length

Cutting the Thumb Hole


4. Now you need to cut the purse out.  First is to take a bowl or the top of an oatmeal round container and cut out the handles.  I mis-marked it on the photo, but you get the idea.  The circle needed to be moved down some from the neck line so you would have enough felt for the handle. Cut the circle out and then trim up the handles.


5.  Now to add some design to the purse.  I decided to do some needle felting for the designs, using roving, a felting needle and felting pad.  Be careful – the needles are very sharp!


6.  Now to sew up the bottom.  You can do this on your sewing machine using a regular needle, unless you have really thick felt.  I wanted rounded corners, but you could sew it straight. I drew my guide line for the bottom seam and then used a bowl to round the corners.

Drawing the corners

Sewing the seam

Trimming the seam


7.  Next is to make the handles a little more sturdy.  I first determined where I would be holding the handles with my hands – folding the section over I sewed a straight line on each side and then sewed that section by folding the fabric over.  Once that was done I rounded out the rest of the handle to the body of the purse.  I really did not have to the last part, but I thought it made the bag look nicer.

Sewing the straight line

Sewing the handle

One handle done


8.  I decided to put a magnetic snap on my purse.  I purchased a 1/2″ size.  Using some leftover felt, I first snipped a small hole for the prong and then measured where the other was to go, snipped the fabric again and inserted it into the felt.  Using a piece of cardboard from a box – I pushed the prongs through that.  I then took the metal support and place that over the prongs and used a hammer to bend the prongs flat, since I could not find my pliers – they used to be in the same cup with my scissors – but I guessed they walked away!  I then trimmed the felt around each snap piece.


9. Figure out where you want the snap to be located on the inside of your purse.  Sew one side on, making sure not to sew over your design, if you have one.  I then put the snaps together and laid the purse out on the table – pinning the un-sewn one onto the purse – then it was back to the sewing machine to sew it on.


My purse was now done.  The really nice thing about this purse, beside the fact that I made it – is that I can either hold it in my hand or the hole is large enough that I can put it on my shoulder.


Digiprove sealCopyright secured by Digiprove © 2011
Posted in Crafts | Tagged , , | Leave a comment

Apple Bread for the Senses!

I came across this recipe when I was looking for what to do with all the apples that were picked with the last tree – it looked delicious, but required more time than I had at the moment.  It has been in the back of my head and I was going to be home for most of the day today – so thought why not.  This bread takes about 4 hours to make – so make sure that you have enough time.  It is delicious and it touches a couple senses, smell, taste and sight – the bread is just beautiful to look at.

Ellijay Style Apple Bread (thanks to PickYourOwn.org)

Bread Ingredients

½ cup warm water (to start the yeast)
2 packets of dry yeast
1 tablespoon of salt
2 Tablespoons Cinnamon
1/2 cup of sugar OR 1/2 cup of  of honey (for sweetness AND the yeast needs it!)
1/3 cup of vegetable shortening (I used butter – had a suggestion to use coconut oil, but I did not have enough left in the jar)
1 and 2/3 cups of hot water
2 medium sweet apples (Red Delicious, Fuji, Gala, etc.), peeled, cored, sliced and diced
3/4 cup applesauce (I used my homemade)
1/2 cup finely sliced, chopped apples (about ⅛ inch thick, and 1/3 to 1/2 inch across; in other words, about the same size and thickness of a nickel)
2/3 cup of powdered milk (I use nonfat dry milk)
7 to 8 cups of all-purpose flour or bread flour (but NOT self-rising flour!)

Icing Ingredients

1 cup powdered sugar (confectioner’s sugar)
1 – 2 Tbls milk
1/4 tsp vanilla

1. Dissolve the yeast in 1/2 cup warm water and set aside in a warm place to activate the yeast.

2. Combine the salt, cinnamon, sugar or honey, shortening (butter) and hot water in a large bowl and mix well with a large spoon.  I used my kitchen aid bowl.

3. Add the applesauce and stir, add the powdered milk and the yeast mixture – mix well.


4.  I placed the bowl on my Kitchen Aid and started adding the flour, 1 cup at a time. I used about 6 1/2 cups of flour.

5. Core, peel and cut up the apples.


6. I turned the dough out onto a floured board and worked the apples into the dough.  This dough is very sticky and with the wetness of the apples – you need to keep your hands and board well floured!

7. Place the dough in a greased bowl and place in a warm place.  I have a gas stove with a constant pilot – so I placed the bowl in there and covered with a cloth napkin.  Let rise until double in size – about 45 minutes.


8.   Punch the dough down – Stella thought this was way cool.  Cover and let rise again, until double in size, about 45 minutes.


9. Grease and flour 2 standard loaf pans.


10. Take the dough out of the bowl and split in half, then shape into a loaves and place in pans.


11. Place the loaf pans in a warm place (back in the oven) and let rise until the loaves are about 1/2 – 1″ above the top of the pan.


12. Bake in a 350 degree oven for 25 – 35 minutes.  The crust should be golden brown and if you have a thermometer, insert and it should read between 185 – 200 degrees.


13.  Take the loaves out of the pans and let cool on a wire rack for 45 minutes to 1 hour.


14. Make the icing – put 1 cup of powdered sugar in a bowl, and the vanilla and then 1 tablespoon of milk – mix well.  If it is too thick, add a teaspoon of milk at a time until the icing is a consistency of your liking.

15.  Drizzle the icing over the top of the bread.

16.  Slice with a serrated knife and enjoy.  This bread is not very sweet, the icing bites add a nice sweetness to it. I left one loaf plain and I think it would be wonderful toasted with a little bit of butter!


Digiprove sealCopyright secured by Digiprove © 2011
Posted in Recipes | Tagged | 2 Comments

A Fun, Quick Hat to Knit

I have really thick, curly hair and I have a hard time finding or knitting the right hat for myself – and I love hats.  I made one last year with ear flaps and hated it on me, so that was given to the first friend who came over and liked it.  This year I was determined to knit myself a hat that would work with my hair and not make me look like a beanie head! I knitted this hat over 2 evenings – I think the yarn is what really made it and I really love the wavy edge.

What You Will Need

1 set of US13 circular needles, 16″
1 set of four US13 double pointed needles
Darning needle
Stitch marker
1 skein, plus a little of Bulky yarn – I used a thick and thin bulky roving (60 yds per skein) – I really wanted to use this yarn, but it is hard to see the lace pattern

Gauge: 10 stitches = 4″

Lace Stitch Pattern (worked on a multiple of 6 stitches)

Round 1: *YO, K1, yo, P1, P3tog (purl 3 together), P1; repeat from * to end of row
Rounds 2, 4 &6: Knit
Round 3: *K3, yo, slip 1 as to knit, K2tog (knit 2 together), psso (pass slipped stitch over), yo; repeat from * to end
Round 5: *P3tog, P1, yo, K1, yo, P1; repeat from * to end
Round 7: Remove beginning of round marker, slip last stitch worked to left needle, replace marker. *Slip 1 as to knit, K2tog, psso, yo, K3, yo; repeat from * to end
Round 8: Knit to marker, remove marker, K1, replace marker
Repeat rounds 1 – 8 for pattern.


1. Cast on 60 stitches and join in a round, being careful not to twist stitches.  Place marker and work 4 rounds of garter stitch (purl 1 round, knit 1 round).

2. Start the Lace Stitch Pattern and work until piece measures approximately 5″ from cast on edge.

Shaping the Crown
Round1: *K8, K2tog; repeat from * to end of round
Round 2 and all even numbered rounds; Knit
Round 3: *K7, K2tog; repeat from * to end
Round 5: *K6, K2tog; repeat from * to end
Round 7: *K5, K2tog, repeat from * to end
Round 9: *K4, K2tog; repeat from * to end
Round 11: *K3, K2tog; repeat from * to end
Round 13: *K2, K2tog; repeat from * to end
Round 15: *K1, K2tog; repeat from * to end
Round 17; *K1, K2tog: repeat from * to end (8 stitches remaining)


Finishing

Cut yarn, leaving a 10″ tail.  Thread the tail onto a darning needle and pass through the remaining stitches, twice.  Pull up snug and fasten off on the inside.  Weave in ends.


Digiprove sealCopyright secured by Digiprove © 2011
Posted in Crafts | Tagged | 2 Comments

The Church Bazaar – Good Finds, Everywhere

Each year the church around the corner from us has their Bazaar.  We do not attend this church, but Stella’s friend Mateo’s family does, so we do have a connection there.  This is something that both Stella and I look forward to each year – Stella because of the toys and books and me, because of everything.  So on Saturday, after soccer practice, we stopped at the bazaar and ended up being there for about 2 hours.  Part of the reason we are there so long was the catching up with friends that we have not scene in awhile, kids from earlier classes of Stella, etc.  It is a great way to catch up with many in a relatively short time.

Of course the first stop was the kids area!  Stella brought her allowance money and was very careful with how she spent it, at least the first time she was there.  She saw some Pokeman cards and made a bee line to them, but another older kid was going through them and was going to buy them all, but he was so nice and he went through several stacks and gave many to Stella.  I found a great basket with a liner that will be perfect to keep my knitting projects in.  Next it was inside and to the Christmas room, the finer items and the White Elephant section, one of my favorites and this year it definitely did not disappoint!   I found a pair of pewter candle sticks, a handmade, ceramic candle stick and a handmade bag that I think is from South America – I love it!  And the basket I bought fit everything inside!


All this for $4!!!!


They also have a silent auction and Stella found a Madame Alexander doll that she wanted, the starting bid was $10 – so she put her name down.  Trying to explain to her how a silent auction works was not so easy and I am not sure she ever completely understood the concept. We were then joined by Mateo and his Papa.  Mateo showed me the items that he had bid on, one of them was for me.  The kids were off and headed back to the kids area and I was able to visit with some adults.

I headed down to the clothing area in search of wool sweaters.  I found 7 great wool sweaters along with a great corduroy skirt.  Now, I could not wait to get home and start the project that I needed the wool sweaters for – stay tuned – the project will be in a future post!


$1 per item – a great bargain for $8!


I headed home and Stella stayed with Mateo, visiting with friends and looking for more treasures.  The silent auction was over at 3:30, so at 3pm I headed back over with Stella and Mateo – so they could check their items and see if they needed to make another bid.  Someone had bid on the Madame Alexander doll for $15, so Stella thought she need to double that bid – so of course she bid $30 – told you I did not think she understood the concept!  I crossed her bid off and put another bid for $16.  Both Mateo and Stella watched their items, ok they hovered over the bid cards, hoping that no one would make another bid and they would win.  The count down started, 2 minutes, 1 minute, 30 seconds, 10, 9, 8, 7, 6, 5, 4, 3, 2, Closed!  They were both ecstatic – they had won their items – I was very grateful that they decided to call the kids first to get their items and pay!


My gift from Mateo, a frog that holds business cards – I love it!  You can’t tell very well by the picture, but the frog is orange.  Very thoughtful of Mateo!


Digiprove sealCopyright secured by Digiprove © 2011
Posted in Life | Tagged | 1 Comment

Vegetarian Pot Pie In The Crock Pot, Really?

When I came across a recipe for a vegetarian pot pie with a biscuit crust that you could make in the crock pot – I had to try it!

Vegetarian Pot Pie with Biscuit Crust

Ingredients

3 Tbl olive oil
1 medium sized yellow onion – chopped
1 large carrot, chopped
1 cup plus 2 Tbl flour (I used un-bleached white since I was all out of wheat)
1 large potato, peeled and diced
3 cups cooked chickpeas or two 15.5 oz. can chickpeas, drained and rinsed
1/2 cup frozen peas
3/4 cup vegetable stock/broth
1 Tbl soy sauce or tamari (I used tamari)
1/2 tsp dried thyme
1/2 tsp dried savory
Salt and freshly ground pepper
2 tsp baking powder
1/2 tsp baking soda
1/ cup milk or soy milk (I used milk)


1. Chopped the onion and carrot.  Heat 1 Tbl oil in a medium sized skillet over medium heat.  Add the onion and carrot, cover and cook until softened, about 5 minutes.

2.  Drain and rinse the chickpeas.

3. Peel and dice the potato.

4. Lightly grease the inside of the crock pot.


5. Transfer the onion and carrot mixture to the crock pot.  Add 2 Tbl flour and mix to coat.


6. Add the potato, chickpeas, peas, stock, tamari, thyme and savory – mix.  Season with salt and pepper.  Cover and cook on low for 5 hours.


7. About an hour before you are ready to serve, make the crust.

8. In a large bowl, combine 1 cup of flour, the baking powder, baking soda and 1/2 tsp salt.

9. Quickly stir in the milk and the remain 2 Tbl olive oil until just blended.


10. Spoon the biscuit topping over the surface of the simmering vegetables.


11. Turn the heat to high, cover and cook for about 1 more hour – making sure the crust is cooked through.

12.  Serve within 10 – 15 minutes after the crust is done for the best taste results.

I enjoyed this and will be eating a lot of it during the week – Stella did not like it.  I think the next time that I make it I will add a little more broth, some more vegetables and double the seasonings to add a little more flavor.  I was really amazed at how light, fluffy and good the biscuit topping was!


Digiprove sealCopyright secured by Digiprove © 2011
Posted in Recipes | Tagged , | 2 Comments

Repurposing an Old Quilt

I had a quilt on my bed, not old, but handmade and over the course of the last year, Bernie (our dog) had pretty much destroyed it.  Bernie likes to climb into my bed, collect all the blankets into a ball/bed.  With him doing this over and over again – there are rips that go all the way through the quilt along with tears in many other places – he has also ripped three sets of sheets in doing this.  My bed is now off limits to him!

I took the quilt off my bed, was tired of picking up pieces of it off the floor, and looked at it for over a week.  I could not bring myself to just through it away.  I washed it and then looked at it for another week trying to decide what to use it for and then an idea came to me.  I am a knitter and my knitting roll is starting to come apart and there are holes in it – so I decided why not try and make a knitting needle roll.

Because I was re-using a quilt I did not have to do an outside and inside fabric for the frame of the roll.

Items Needed

Material (will give dimensions below)
Button and tie
Single folded bias tape
Thread to match
Fleece lining or quilt batting – if not re-using a quilt

Directions for Making a Knitting Roll

1. Cut one piece of quilt, dimension 15 inches x 15 inches.  If you are not re-using a quilt  you will need to cut 2 pieces of fabric in the dimensions listed, along with a piece of fleece or batting – you can use the same fabric but contrasting fabrics will make it look nicer.

2. Cut the following pieces:
one piece of fabric 8 1/2 inches high and 15 inches wide. (big pocket)
one piece of fabric 5 inches high and 15 inches wide. (small pocket)
one piece of fabric 2 /2 inches high and 15 inches wide (upper needle guard)

3.  Pin the pieces together and then trim, making sure that all sides match up.


4.  Stitch the needle pockets – these are normally 1 – 1 1/2 inches wide, but I followed the quilt squares on mine, which were 2 inches wide.  This worked well – since I can now fit more than one set of needles in each pocket.  So if I have a set of 6 straight needles and 6 circular they can go in the same pocket.

5.  Taking the bias tape sew around the knitting roll.  I am not good at the corners when using bias tape so I did the bottom and top and then the sides.

6. Fill with your needles and fold over so you can set where the button will go.

7. I keep a button jar and I found a wooden button in there that had a stretching string with it – so I use that for my tie.  Sew in place.

Voila!  Your own knitting needle roll/holder!  This project took me about an hour, that did not include the time it took me to find a replacement needle for the sewing machine!  I broke the needle and of course could not remember the “safe” place that I had put my extra needles.  That is thing about “safe” places – they always seem logical when you are putting something there, but when you need to find the place – it is not always easy to remember.

Since this was a queen sized quilt – others project will be made from the remaining fabric – have to put my thinking cap on!


Digiprove sealCopyright secured by Digiprove © 2011
Posted in Crafts | Tagged , | 1 Comment

Add Some Flare to Your Cranberries

I am not a huge cranberry fan, but Stella is and she loves, loves, loves this recipe.  So do many of my friends and I have been asked to post the recipe – told them they had to wait until it was cranberry season.  I was in the grocery yesterday and there they were – CRANBERRIES – so I bought some and made cranberry sauce last night.

A Different Kind of Cranberry Sauce

Ingredients

Cranberries (12 ozs.)
Blueberries (mine are frozen from picking in July)
1 Orange – try to get an organic one since you will be using the zest
Water
1/2 – 3/4 cup sugar


1. Wash and pick through the cranberries, taking any bad one out and stems.


2. Take your orange and roll it on the counter – this helps with getting the most juice out of it.  Slice the orange in half and juice it.  Pour the juice into a glass measuring cup.  Once you have juiced the orange add water to equal 1 cup of liquid.

3. Place the cup of liquid and 1/2 – 3/4 cup sugar in the saucepan.  Most recipes call for 1 cup of sugar, since I use the orange and blueberries I cut the sugar – but it is really up to you.  Bring to a boil.

4. Once the liquid and sugar have come to a boil, add the cranberrries and the zest of the orange.  Mix and bring back to a boil.

5. Once it mixture has come to a boil, reduce the heat so that it is a gently boil and add the blueberries – I add anywhere from 1 – 1/2 cups. Stir.  Simmer for about 10 minutes.

6. Pour the sauce into a glass bowl or casserole dish, cover and let cool to room temperature.  Once it is room temperature place in the fridge.

Stella will ask for this with every meal and in her lunch until it is gone – about 4 days!

Digiprove sealCopyright secured by Digiprove © 2011
Posted in Recipes | Tagged , , | 6 Comments

Make Your Own Gel Room Fresheners

Lately it seems that all it does is rain.  Everything is damp, waterlogged and smells, especially the dog.  The smell of wet dog is one of those smells I just can’t stand.  I put baking soda on the area rugs almost daily, have forbid the dog on the furniture, mainly because when I sit on the couch I feel that I then smell like wet dog and open the windows whenever I can – even though Stella tells me how cold she is.  I need to find another way to combat the smell – so I decided to try making my own gel room fresheners.

These are made with unflavored gelatin and that took a couple trips to different stores before I found it.

Gel Room Freshener

Things You Will Need

1 box gelatin (4 packets)
Water
Salt (to prevent mold)
Food coloring (optional)
Essential Oil (10 – 30 drops)
Dropper or syringe
Glass jars (I used 1/2 pint canning jars)
Saucepan
Glass measuring cup or bowl


1. In a saucepan mix 1 cup of water, 2 Tbl salt and food coloring if using – bring to a boil.


2. While the water is boiling, mix the 4 packets of gelatin in 1 cup of ice cold water, stir until dissolved.


3. Once the water, salt and food coloring is boiling, mix with the gelatin mixture – stir well.  The mixture will become cloudy, but that will change when it is setting.  You may have to add more food coloring at this point.  I decided to do orange food coloring since I was going to use Orange essential oil.

4. Once it is well mix add the essential oil, anywhere from 10 – 30 drops.  The amount of oil you add will be determined by how strong you want the scent.  Mix well.

5. Pour into your glass jars and let set at room temperature – this will take some time.  You can speed up the setting process by putting the jars in the fridge – but just be warned that the smell will permeate in the fridge – I chose to just let set on the counter – I was afraid that my food would taste like orange, but I am very sensitive to smell.

Once the jars have set you can cover with plastic wrap until ready to use.  If you do not want to use right away cover with plastic wrap and seal.  I did one of mine with the canning lid and put small holes in (with a nail and hammer) and then put the ring on – I placed this one in the bathroom and since it is small I did not an overwhelming smell. The other one I left uncovered in the living/dining room and the smell is very pleasant  I have heard that these will last anywhere from 1 month to 6 months – so I will see how long my last.  I think next time I might put some items in – I read that you could do marbles, shells, dried herbs, artificial flowers – nothing that could mold.  I think it would look really nice to line the outside of the inside of the jar with cinnamon sticks and then use a spicy essential oil.  I so hope this helps with the smelly dog scent!

Digiprove sealCopyright secured by Digiprove © 2011
Posted in Crafts, Recipes | Tagged , | 1 Comment