
 Follow
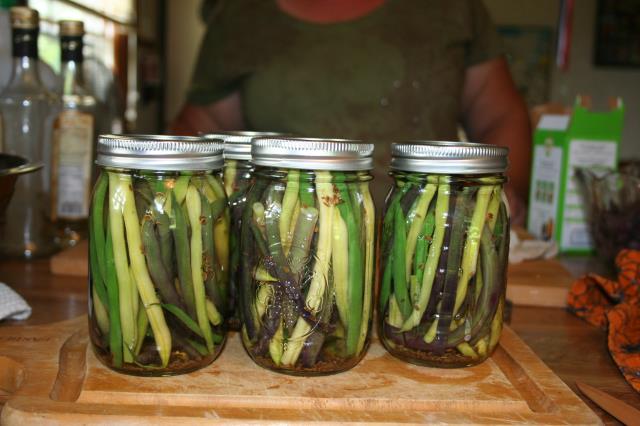
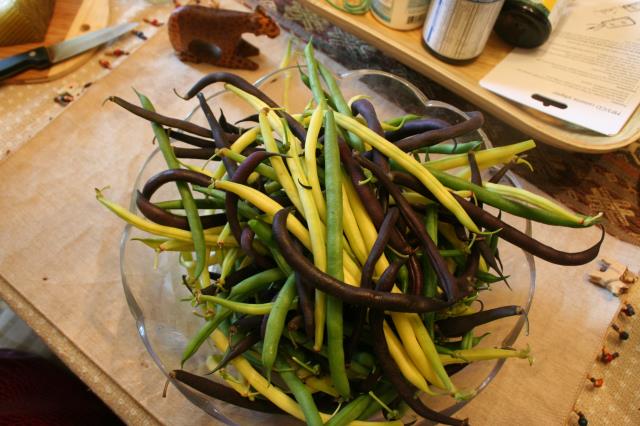
It is so much fun canning with other people! A friend came over with a whole lot of beans from her garden -so we decided to pickle them or another name for them is Dilly Beans. I have Dilly Beans at other friend’s houses, but I have never made them – I usually blanch my beans and then freeze them – so this was a new one for me. It is so great to see my cabinets filling up with such great canned veggies. Just placed an order for several cases of tomatoes – so will be making sauce, stewed , and ketchup – keep an eye out for those post in the next week or two.
The only thing that I find when I am canning with someone else is that I am not so great in remembering to take the photos. I get caught up in visiting, sharing stories, sharing recipes, etc – you get the picture. I will try and make a better effort in the next canning session!
Dilly Beans (Pickled Beans)
Ingredients
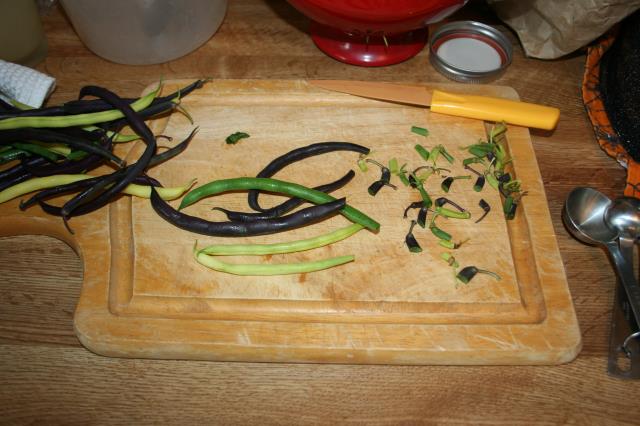
2 pounds green or other color beans, trimmed to fit your jars
1 teaspoon cayenne pepper (you can use more if you like them spicy!)
4 teaspoons dill seed (not dill weed)
4 cloves garlic
2 1/2 cups white vinegar (5%)
2 1/2 cups water
1/4 cup pickling salt (use a bit more if you’ve only got kosher)
Items Needed
Canning pot
Canning tray
Jar grabber
Large sauce pan
Pint jars and lids
Plastic knife
1. Fill your canning pot with enough water to cover the jars. You will want to insert a rack to keep your jars off the bottom of the pot – when it is time to place the jars.
2. You can either sterilize your jars in the canning pot or use your dishwasher.
prepare the rest of your ingredients.
3. Wash and trim your beans so that they fit in your jar.
4. Combine vinegar, water and salt in a medium saucepan and bring to a boil. While it’s heating up.
5. Place your lids into a small sauce pan and cover them with water – heat the water to almost boiling. This will sterilize the lids and make the rubber sticky.
6. Pack your beans into the jars, leaving 1/2 inch headspace (distance between the tops of the beans and the rim of the jar).
7. To each jar, add 1/4 to 1/2 teaspoon cayenne pepper, 1 clove of garlic and 1
teaspoon dill seeds.
8. Pour the boiling brine over the beans, making sure to leave that 1/2 inch headspace. Use a plastic knife to remove air bubbles from jar by running it around the interior of the jar.
9. Wipe the rims of the jars and put a lid and ring on.
10. Process for 5 minutes in a boiling water bath (remember that you don’t start timing until the pot has come to a roiling boil).
The processing time listed is for altitudes of 1,000 feet or less. For altitudes up to 3,000 feet, add 5 minutes; 6,000 feet, add 10 minutes; 8,000 feet, add 15 minutes; 10,000 feet, add 20 minutes.
11. Take the jars out of the water bath and place on counter (I place a dishcloth down) and then wait to hear the pop of the lid – this means that the jar sealed. If a jar does not seal, turn upside down and let stand for 15 – 20 minutes and then turn over – the jar should have sealed. If a jar does not seal this will be the jar that you indulge in first!
Note: These beans want to hang out for a least two weeks before eating, to thoroughly develop their flavor. Then ENJOY!
 Copyright secured by Digiprove © 2013


They look beautiful and I love that there’s NO sugar in the brine!! : )
Love it…..we have been eating a lot of beens so this might be a good alternative to save some!
These look so tasty!