
 Follow
It seems with all the snow that we would have A LOT of extra time for crafting, baking, creating… but the time has flown by! Our days have been filled, not sure with what exactly, but the next thing I know another week has passed. With St. Patrick’s day approaching I figured it was a good time to re-post this!
Originally posted on March 14, 2012
Yes, we made another wreath, but this time it was for St. Patrick’s day. I love making crafts with Stella – never know exactly how it will turn out until we are done. We made this one a little smaller, using one of the straw wreaths I picked up at Goodwill for $0.99 – Stella asked why we were not using a bigger wreath like our Valentine wreath – go figure, the things she remembers. This took a couple of days to complete – only because Stella had such a busy schedule!
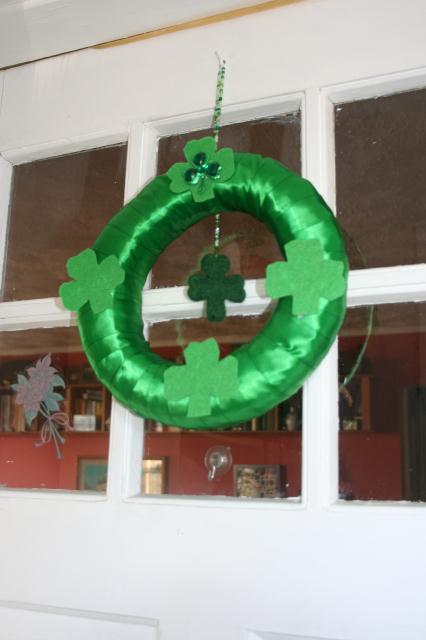
St. Patrick’s Day Wreath
Items Needed
Straw wreath – any size
Green ribbon (2 – 3 spools, depending on size of wreath)
Beads
Glue
Glue gun
Felt
Green wool roving
Felting pad
Felting needle
Thread and needle
Shamrock cookie cutter
1. Unwrap the straw wreath and wrap with green ribbon. I used a glue gun to secure the ribbon.


2. If you are going to do a felted shamrock to hang in the middle – get your supplies set up (wool roving, felting needle, felting pad and shamrock cookie cutter).
3. Stuff the cookie cutter with the wool roving and then using the felting needle felt the wool. Once the wool is felted take the shamrock out of the cookie cutter and shape the shamrock with the felting needle – this also felts the wool more and makes it firmer.


4. Double thread a needles, preferably with green thread and thread through the top of the shamrock. String as many beads as you will need to hang the shamrock on the inside of the wreath. Secure the shamrock to the top of the wreath (on the inside).


5. Trace shamrocks on green felt. We used the firm felt and I was able to find felt that was made from post consumer plastic. Cut your shamrocks out.

7. Decide where you want them on the wreath and then secure with glue. Allow to dry. We also found a “jeweled” shamrock from an old hair tie of Stella’s so that was also used on the wreath.

8. Using either green ribbon and a string on beads attach a hanger to the wreath.
9. Hang on your door or some place in your home. Hopefully all those shamrocks will bring luck to your home!
 Copyright secured by Digiprove © 2012-2015


The felted shamrocks are awesome. (Like your banner photo too… looks like Spring.) Stella is a VERY lucky girl. : )
The felted shamrocks are awesome. : ) (Like the banner photo – looks like Spring.) That Stella is one lucky girl. : )
Pretty cute! the wreath too!